↧
Nu kan vi flytta in i gäststugan!
↧
Potatis, Pizza, Påsk
Nu har vi bott i gäststugan i nästan 3 veckor och trivs mycket bra! Bygget har tagit upp mycket tid och därför har det blivit mindre här på bloggen...
We have now lived in the guesthouse for almost 3 weeks and like it here a lot! The construction project is taking up a lot of time, thus less time is devoted to the blog...
Sedan jag skrev sist, för 4 veckor sedan, har det hänt en hel del i det stora huset: nedervåningen har nu väggar putsade med hydrauliskt kalkbruk, skiffergolv och träullit akustik skivor som innertak, övervåningen har fått innerväggar med elkablar och linisolering, vitvaxad panel i taket och på innerväggarna, badrumsgolvet har nu golvvärmeslingor och har flytspacklats. Ute har vi gjutit en sula till muren vid terassen.
Lots has happened in the main house since the last blog post, almost 4 weeks ago: the downstairs walls are plastered with hydraulic lime plaster, slate floor and träullit acoustic boards in the ceiling, upstairs we now have walls with flax insulation and electrical cables, white waxed panel in the ceiling and on the walls, bathroom floor with floor heating and self-leveling concrete. Outside we have poured concrete for the foundation of a wall by the patio.
Nu tar vi en paus i byggandet och sätter potatis i jorden, njuter av lokalt vedugnsbakad pizza och firar påsk!
Now we take a break from the construction and plant the potato patch, enjoy locally baked pizza and celebrate Easter!
↧
↧
Nu gräver vi igen!
Bor man på en byggarbetsplats blir det mer byggande och mindre bloggande...Sist jag skrev ett inlägg satte vi ner potatisen i jorden, och nu njuter vi av skörden! Barnen kör matlastbilar från trädgården till köket.
If you live at a construction zone you spend more time building than blogging...Last I wrote a post we planted potatoes, and now we enjoy harvesting them! The kids drive their food truck from the garden to the kitchen.
Ibland är rödbetorna så stora att de knappt får plats i ett litermått!
Sometimes the red beets are so large they barely fit in a quart measuring cup!
För ett år sedan tog vi första spadtaget. Grävmaskinerna var nyligen tillbaka för att fixa markarbetet runt husen.
A year ago we started digging. The diggers were recently back again to help us with some landscaping around the house.
Nu har vi ett par veckors jobb framför oss med stenläggning...tar lite i taget för det är ganska tungt när man inte är van.
We now have a few weeks of work waiting for us, with all the stones...it is quite heavy work when you are not used to it, so we do it in small portions.
Kullersten
Cobblestone (natural, round stone)
Gatsten
Cobblestone (cut granite blocks)
Sandsten
Sandstone
Stora huset håller på att bli färdigt. Om en månad ungefär hoppas vi kunna flytta in. Nu är det nedgrävning och gjutning av plintar till farstukvisten som gäller!
The main house is in the process of being finished too. In about a month we hope to move in. Right now we are working on the supports for the front porch!
↧
Däck av OrganoWood
Denna veckan blev vi färdiga med vårt trädäck!
This week we finished our wooden deck!
Det är byggt av OrganoWood, tryckimpregnerat virke utan gifter (både reglar och trall). Istället för biocider och tungmetaller som används i det vanliga gröna tryckimpregnerade virket använder OrganoWood kisel:"Vår metod går ut på att modifiera träet genom att koppla kiselämnen till träet under hårt tryck. Det gör att träfibrerna fossileras. Resultatet är ett motståndskraftigt trä med ett naturligt och effektivt skydd mot både röta, eld, vatten och fukt."
It is built with OrganoWood, pressure treated wood without the regular green poison (biocides and heavy metals). A silicon based compound binds to the wood fibers making the product stronger and rot resistant.
Nu är virket ljust, och ser nästan vitvaxat ut. Det vita är salter som man försiktigt kan slipa eller borsta bort. Med tiden kommer det att bli vackert ljusgrått, om man inte väljer att lasera det.
The wood is light in color now, looks almost like we waxed it white. The white is salt that you can carefully sand or brush off. With time the wood will change to a beautiful light grey color, unless you choose to stain it.
Vi valde deras premium trall produkt. Den är redan behandlad med "OrganoWood Smuts och Vattenskydd"(finns också att köpa på burk för att behandla själv): "ger virket en högre formstabilitet (svällning <2 %), en minskad risk för ytlig påväxt samt en yta som åldras och grånar jämnare och är lättare att rengöra." Testade med lite vatten för att se att vi verkligen fick premium trallen för man kunde inte se någon skillnad i ytan på trallen och reglarna. Jodå, visst lägger sig vattnet i små droppar på ytan istället för att sugas upp av träet!
We chose their premium wood which is already treated with a "dirt and water protection" product (which you can also buy in a bucket): supposed to prevent swelling of the wood in moist environments, reduce risk of algae growth and make it easier to keep clean. I tested with some water to ensure that we really got the premium version we ordered since you could not tell the difference by looking at it or touching it. Yes, the water stays as droplets on top of the surface instead of being absorbed by the wood!
↧
Sol och ved
I mars fick vi upp solfångarna på taket som jag skrev om i detta inlägget. Vi är mycket nöjda med denna investering!
In March we installed the solarpanels on the roof which I wrote about in this post. We are very satisfied with this investment!
Först nu i slutet av september har vi fått börja tänka på uppvärmningen av varmvattnet. Hela våren och sommaren tog solfångarna automatiskt hand om varmvattnet och golvvärmen. Nu får vi fortfarande stor hjälp av dem till golvvärmen som inte kräver mer än ca 30 grader. Till exempel, idag var det 14 grader varmt i luften och mulet. Solfångarna matade in 35 grader i tanken!
Now at the end of September we have had to start thinking about the heating of hot water. During the spring and summer the solarpanels heated all tapwater and floor heating water automatically. We still get a significant contribution from the solarpanels to the floor heating since it does not require more than about 30°C. For example, today it was 14°C outside and cloudy. The solarpanels heated up the tank to 35 degrees!
Men mulna och regniga höstdagar räcker inte sol energin till för att producera varmvatten. Då har vi tre alternativ: 1) sätta på elpatronen i ackumulatortanken, 2) elda i den vattenmantlade kaminen eller 3) hoppas på att solen skiner imorgon.
But cloudy and rainy fall days the solar energy is not enough to produce hot tap water. We then have three options: 1) turn on the electrical heating of the water in the tank, 2) make a fire in our water-bearing fireplace, or 3) hope for a sunny day tomorrow.
Alternativ nr 2 är det vi brukar välja!
We usually choose option number 2!
Vi har sparat alla små spillbitar från bygget så vi eldar naturligtvis upp dem först. Men eftersom det är mest fur och gran så är det bäst att elda med "riktig" ved (bok och björk) och bara blanda in lite spillbitar då och då. Vi målade precis färdigt friggebodens fasad så den blev klar inför vedleveransen. På baksidan har vi vårt vedförråd.
We have saved all the little scrap wood pieces from the construction so of course we burn them first. However, since it is mostly pine or spruce it is better to use "real" firewood (beech or birch) and then add in some scrap pieces. We just finished painting the exterior of the shed, just in time for the wood delivery. On the back side of the shed we keep our wood stacked.
Nu har vi staplat ca 10 kubik meter bokved. Ska bli spännande att se hur mycket som går åt första vintern...
We have now stacked about 10 cubic meters of beech wood. Will be very interesting to see how much we will go through during the first winter...
↧
↧
Nu sår vi en äng
På södra sidan om garaget/gäststugan har vi nu planterat en äng!
We just planted a meadow on the south side of the garage/guesthouse!
Det finns ett företag som heter Pratensis i Småland som har specialiserat sig på ängsfröer och skötsel av ängar. Vi beställde 200 gram av deras humleblandning som består av 70% örter och 30% gräs.
There is a company called Pratensis in Småland that is specialized in meadow seeds and the maintenance of meadows. We ordered 200 grams of their humleblandning which consists of 70% flowers and 30% grasses.
Innan vi började bygga fanns det gräs och hallonplantor där vi nu planterar äng. Under byggets gång har dock denna marken varit ganska fri från växtlighet vilket är bra för sådd av äng. Det är mager jord, vilket är perfekt för ängsblommor! Vi grävde upp marken och rensade bort det lilla ogräs/gräs som fanns. Sedan satte vi upp snöre för att påminna alla små fötter om att det nu är planterat här.
Before the construction there was grass and raspberries where we are now planting a meadow. During the construction this piece of land has been mostly free from vegetation which is ideal for establishing a meadow. The soil is poor, which is perfect for meadow plants! We tilled the soil and removed the few weeds and grasses that were there. We then put up stakes and rope to remind little feet that this area is now planted.
Sedan planterade vi några plantor som vi också köpte från Pratensis: cikoria, axveronika och brudbröd.
Then we planted a few plants that we also bought from Pratensis: cikoria, axveronika och brudbröd.
Man sår bara 3-4 gram frö per kvadratmeter. För att lättare veta var man sått rekommenderar Pratensis att man blandar fröna med sågspån, vetekli eller liknande. Vi sparade en hel sopsäck sågspån från bygget så vi använde det till sådden.
You sow only 3-4 grams of seeds per square meter. To make it easier to know where you have spread the seeds, Pratensis recommends mixing the seeds with saw dust, wheat bran or something similar. We saved a garbage bag full of saw dust from the construction so we used that.
Det gick fort att sprida ut fröna. Räfsade lätt och väntar nu på regn (vattnar lite eftersom plantorna behöver vatten)!
We quickly spread out the seeds. Light raking and now we wait for rain (we do water some since the plants need water)!
Man får ha lite tålamod när man anlägger en äng. Det tar ett par år innan den kommer igång. Ska bli spännande att se hur mycket som blommar nästa år!
You need patience when establishing a meadow. It will be a few years before all the plants are blooming. Will be interesting to see what blooms next year!
↧
Ytterdörren på plats
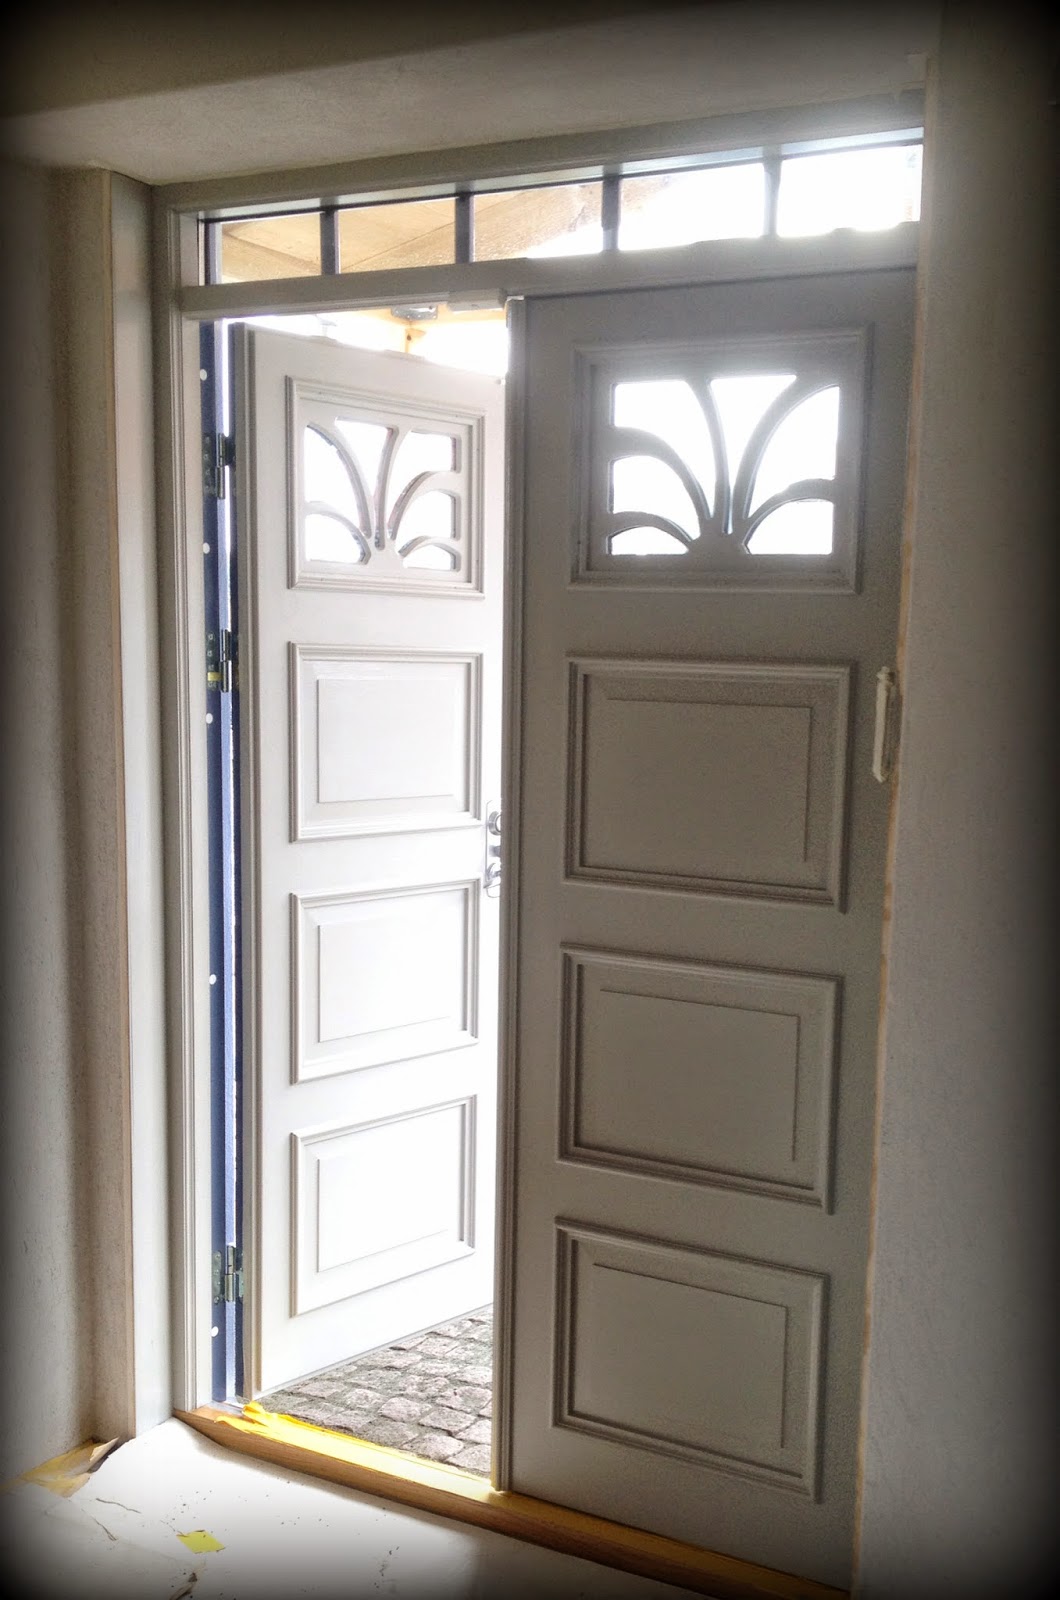
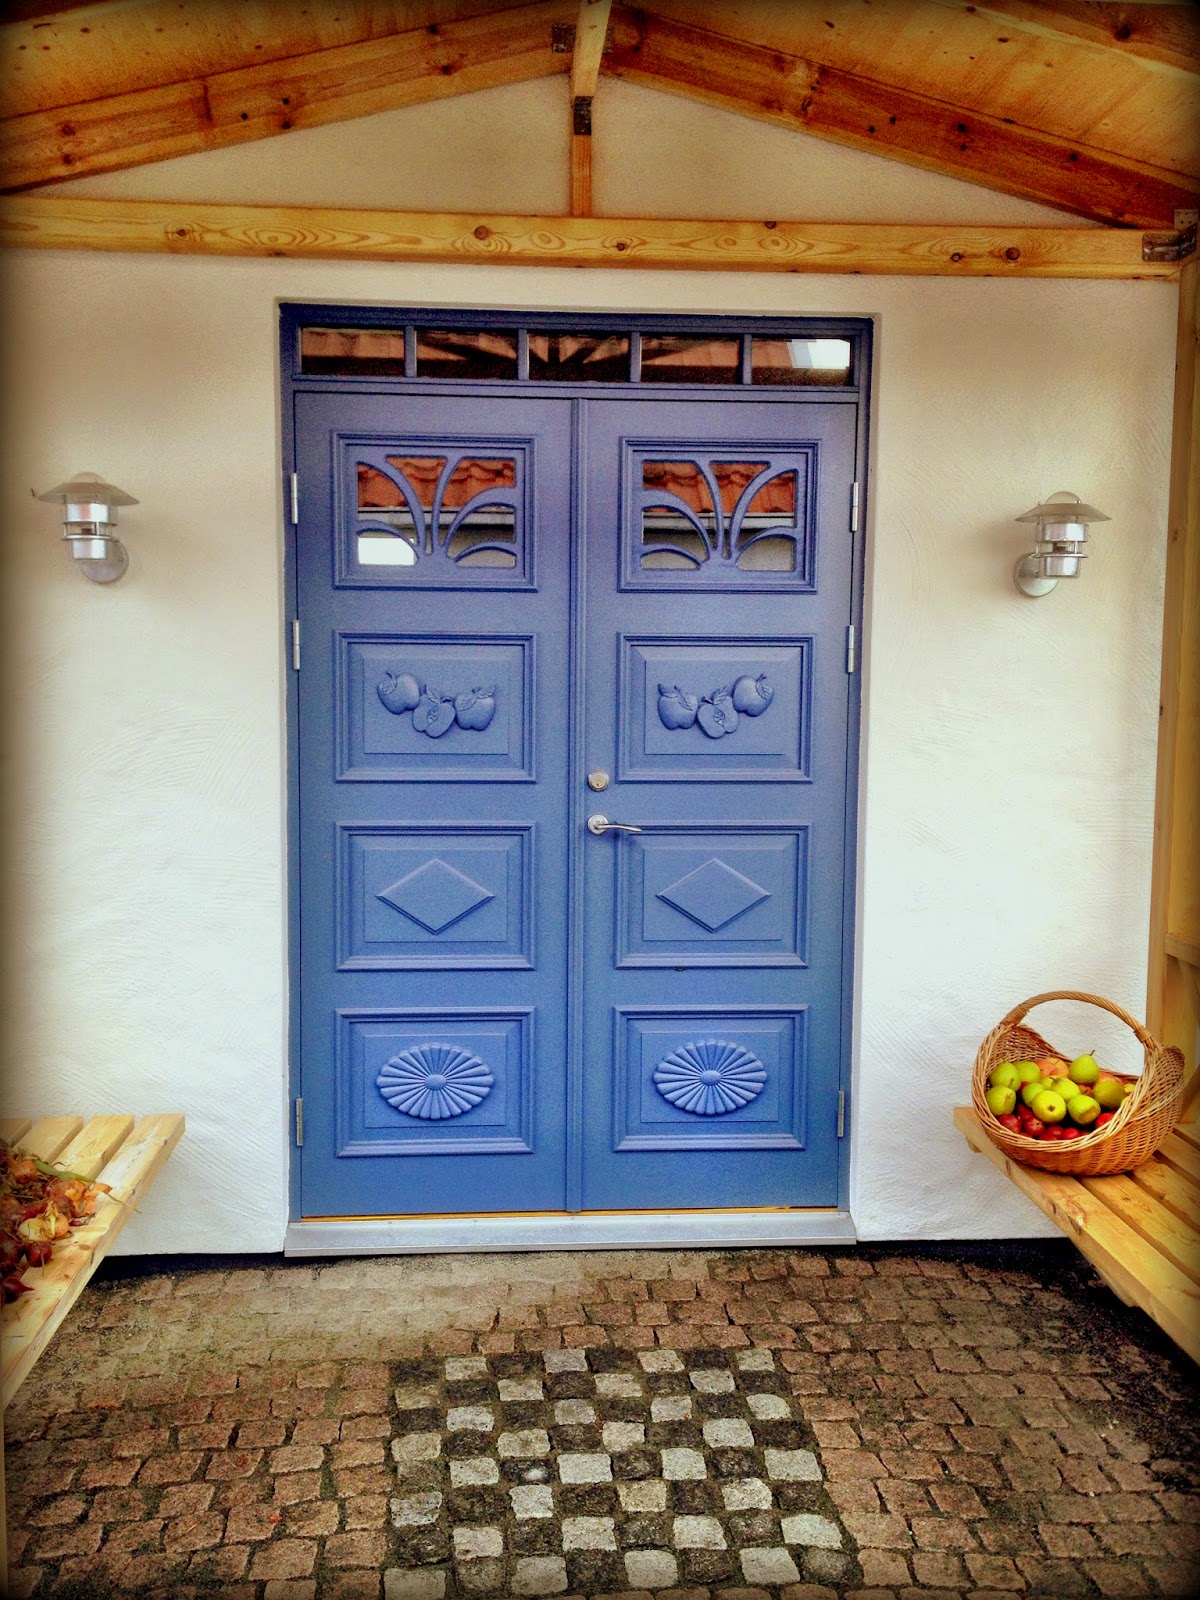
I somras, innan vi skulle måla fasaden, satte vi in den vackra ytterdörren som jag skrivit om i tidigare inlägg -Ytterdörr från lokalt snickeri,Konstverk på ytterdörren, Dörren får färg. Vi ville putsa smygarna innan vi målade fasaden så att allt kunde målas på en gång.
This summer, before we painted the facade, we installed the beautiful door that I wrote about in earlier posts - Main door from local carpenter,Art on the main door, The door is painted. We wanted to finish the stucco around the door so we could paint everything at once.
Vi är verkligen nöjda med dörren - storlek, färg och design!
We are really happy with the door - size, color and design!
Utifrån
From the outside
Inifrån
From the inside
Farstukvisten kommer i nästa inlägg...
Front porch will come in the next post...
↧
Farstukvisten växer fram
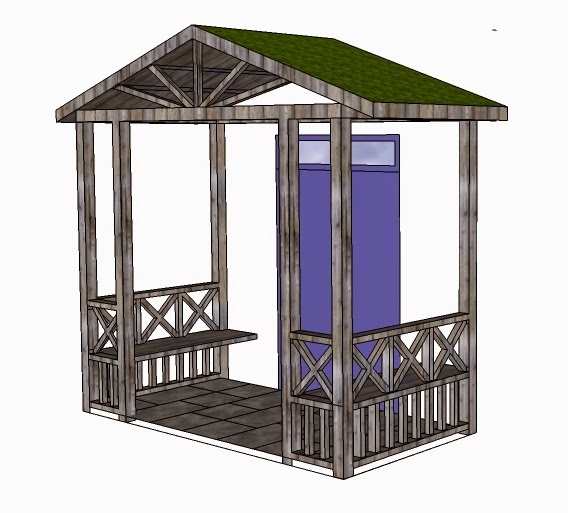
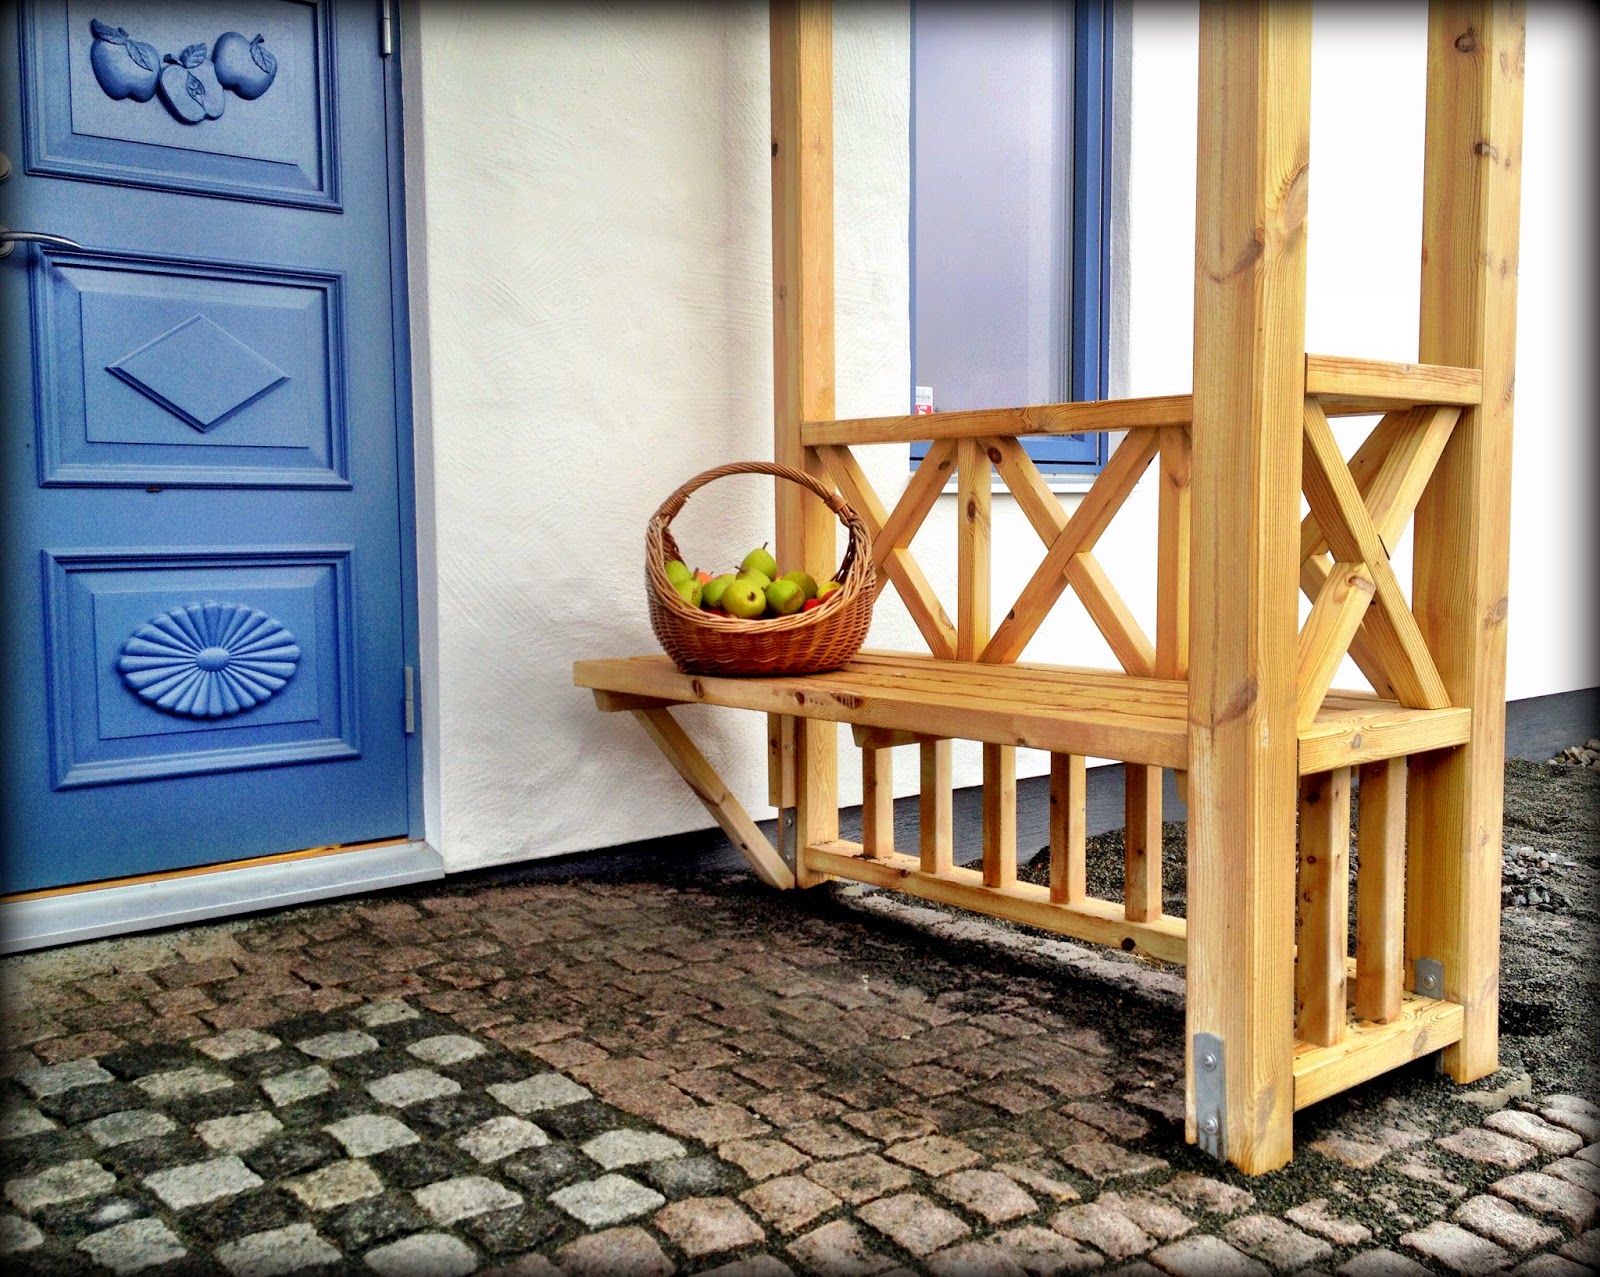
Efter att ha studerat många farstukvistar ritade jag en farstukvist till Villa Natura, i Google SketchUp:
After studying many different front porches I designed one for Villa Natura, in Google SketchUp:
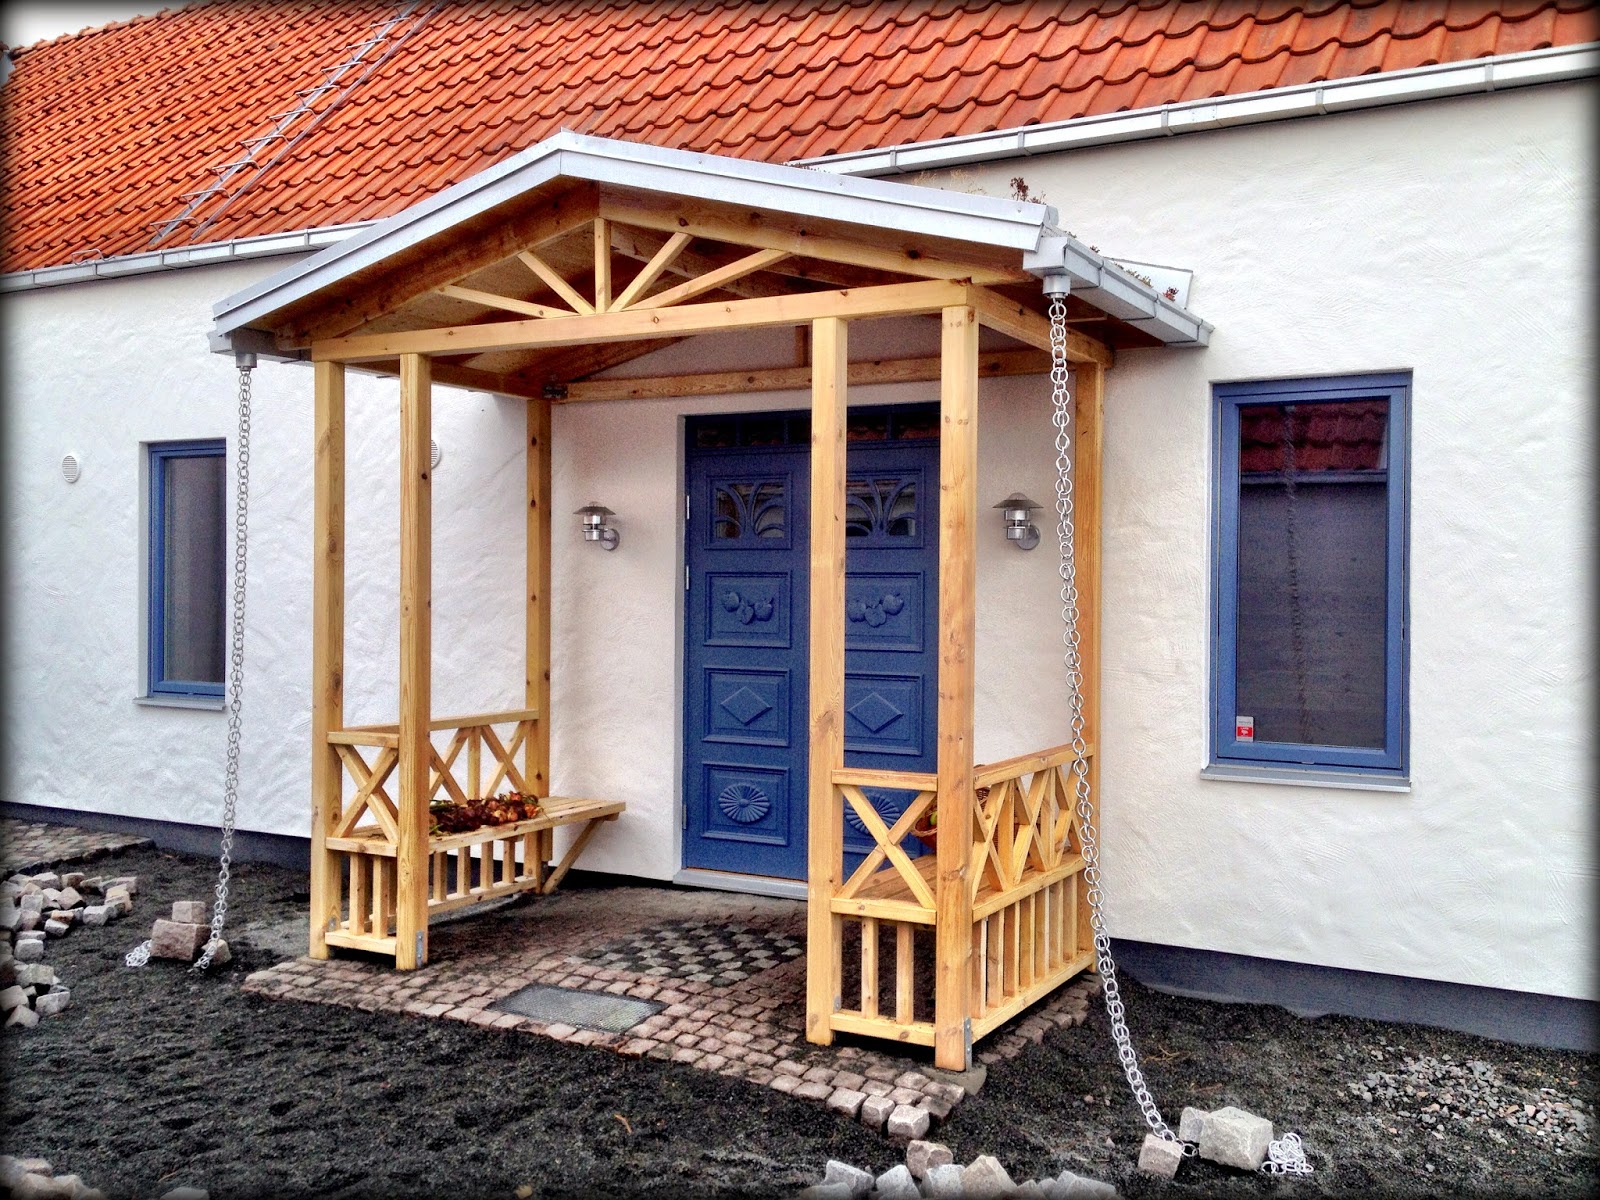
Jag ville båda rama in och skydda ytterdörren. Bänkarna är mysiga att sitta på men också praktiska när man ska ut med grejor eller kommer in med geggiga kläder från äventyr i naturen. Yttermåtten nertill är ca 1.5 m djup och 3 m bred, med en ingång som är 1.8 m bred. Den är byggd av Organowood som vi också använde till vårt trädäck, förutom råsponten till taket. Vi har behandlat den med
"OrganoWood Smuts och Vattenskydd" men kommer annars att lämna den obehandlad så att den blir silvergrå med tiden. Taket är planterat med sedum (mer om det i nästa inlägg).
I wanted to both frame and protect the main door. The benches are cozy but also practical when you are leaving the house with lots of stuff or coming home with muddy clothes from adventures in nature. The structure is approximately 1.5 meter deep by 3 m wide at the base, with the entrance 1.8 m wide. It is built from Organowood which we also used for our wooden deck, except the roofing material. We have treated it with "OrganoWood Smuts och Vattenskydd" but will otherwise leave it untreated so that it will become silvergrey with time. The roof is planted with sedum (more about that in the next post).
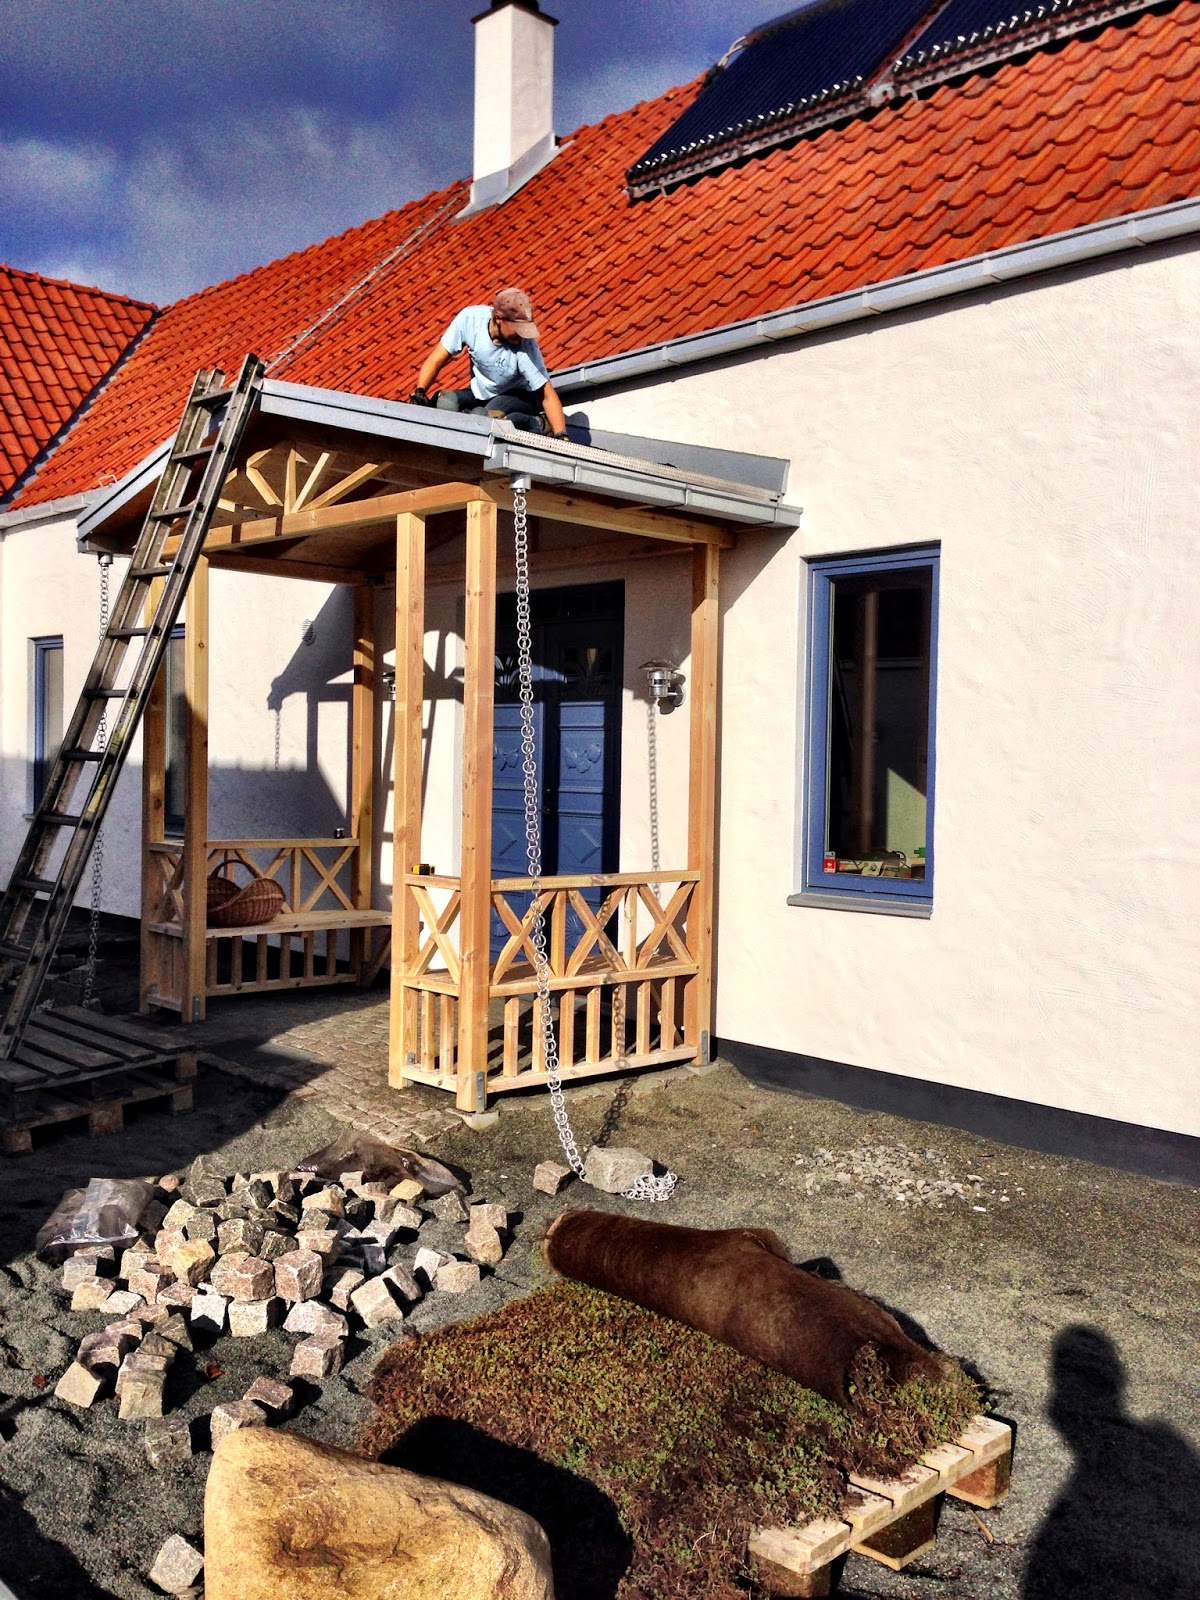
Här är bilder som visar hur den växte fram:
Here are pictures showing how it took shape:
↧
Grönt sedum tak
Som jag skrev i ett tidigare inlägg var jag inne på att ha grönt sedum tak på husen men istället blev det begagnat taktegel. Vi är mycket nöjda med teglet. På farstukvisten blev det dock grönt sedum tak för vi har en taklutning på bara ca 20 grader!
As I disclosed in an earlier post, I was considering a green sedum roof for our houses. Instead we ended up with used clay tile. We are very happy with the roof tiles. On the front porch we can have a green sedum roof since the pitch is only around 20 degrees!
När man bygger grönt tak ska man först tänka på att det ska klara tyngden eftersom det håller kvar mycket regnvatten. Vi har 3 takstolar på detta lilla tak, byggda av 145 mm reglar (Organowood). Sedan ska man ha ett tätskikt eftersom man inte vill att fukten och vattnet tränger ner i träkonstruktionen. Vi anlitade Icopal för tätskiktet. De satte också upp den perforerade kantavslutsplåten som håller jorden och växterna på plats men låter vattnet rinna ner i hängrännan.
When you build a green sedum roof you first need to consider the weight that it needs to hold since the rain water gets heavy. We have 3 trusses for this little roof, made from 145 mm boards (Organowood). Then you have to get a waterproof membrane since you don't want the moisture and water to get into your wooden construction. We used Icopal for the water proofing membrane. They also installed the metal edge with holes that keeps the soil and plants in place at the end of the roof but lets water into the gutter.
Man kan antingen köpa färdiga sedum mattor eller plantera sedum skott. Fördelen med mattorna är att de ligger kvar och klarar vinden vilket är svårare för lös jord och små plantor. Nackdelen är att de kostar lite mer och att art variationen är begränsad. Vi kombinerade 3 kvm färdiga mattor med olika sorters sedum plantor som vi köpt på olika ställen. Här är sedum mattorna och jorden som vi köpte från Svenska Naturtak utanför Malmö. Jordsubtratet är speciellt framtaget för sedum tak för att ha låg vikt. Det innehåller lavasten, pimpsten, kompost, lera. Vi köpte också en fukthållande filt, RMS 500, som man lägger under jordsubtratet.
You can either buy ready sedum carpets or plant sedum shoots. The advantage with the carpets is that they tend to stay where you put them despite the wind which is more challenging with soil and small shoots. The draw back is that they cost more and that they tend to have less variety of sedum plants. We combined 3 square meters of sedum carpets with different types of sedum plants that we purchased separately. Here are the sedum carpets and the soil we purchased from Svenska Naturtakoutside Malmö. The soil is special sedum roof soil to have low weight. It contains lava rock, pumice, compost and clay. We also purchased a moisture felt, RMS 500, which you put under the soil.
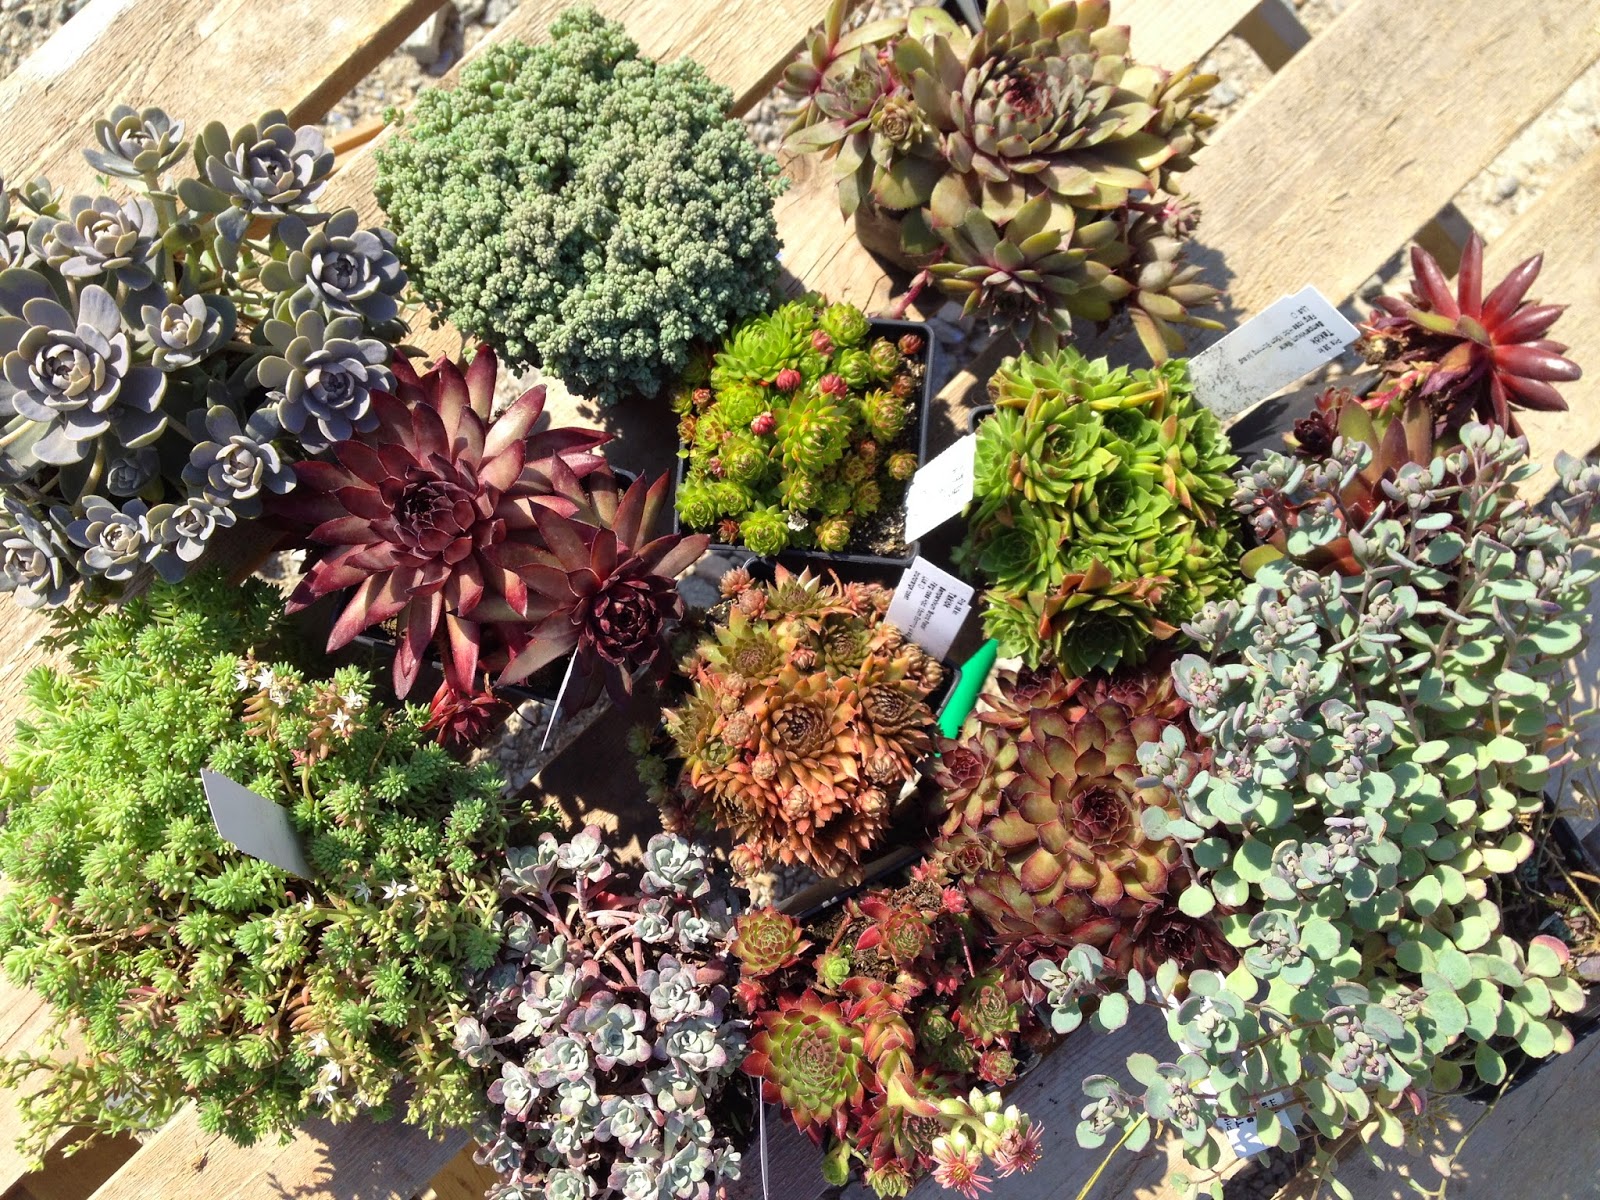
I våras besökte vi olika plantskolor och köpte sedum plantor. Vi bröt av små skott och planterade för att utöka vår samling.
This spring we visited several nurseries and bought different sedum plants. We broke off small shoots and planted to grow our collection.
Under sommaren har de vuxit, blommat och ändrat färg!
During the summer they grew, blossomed and changed colors!
Vi lade sedummattan från Svenska Naturtak i kanterna och vid nocken, och fyllde sedan i med resten av plantorna och skotten i mitten för att få stor variation.
We first put the sedum from Svenska Naturtak around the edges and on the top of the roof, then we added the smaller plants and shoots in the middle to get increased diversity.
Utsikten från badrumsfönstret!
View from our bathroom window!
↧
↧
Inflyttningen kan börja!
Efter många sena nätter blev vi färdiga och förvandlade en byggarbetsplats till ett hem. Igår var det slutsamråd med kommunen och idag var det entreprenadbesiktning. All dokument fanns på plats och bygget blev godkänt utan anmärkningar.
After quite a few late nights we managed to finish transitioning a construction site into a home. Yesterday we had the meeting with the municipality and today with the final inspection. All documents were in order and the project was approved without complaints.
Nu kan vi börja flytta in!
Now we can start moving in!
↧
Kopparbord med världskarta
Nu var det längesedan jag skrev här på bloggen...Vi flyttade in i stora huset i slutet av oktober. Sedan dess har vi tagit det ganska lugnt och så smått börjat inreda, bygga möbler och fixa garderober. Nu är det dags att dela lite fler bilder från Villa Natura och berätta lite om bygget och besluten.
It has been a while since I updated this blog...We moved into the main house at the end of October. Since then we have taken it pretty easy and started to decorate, build furniture and arrange closets. Now it is time to share more pictures from Villa Natura and to write about the construction project and decisions made along the road.
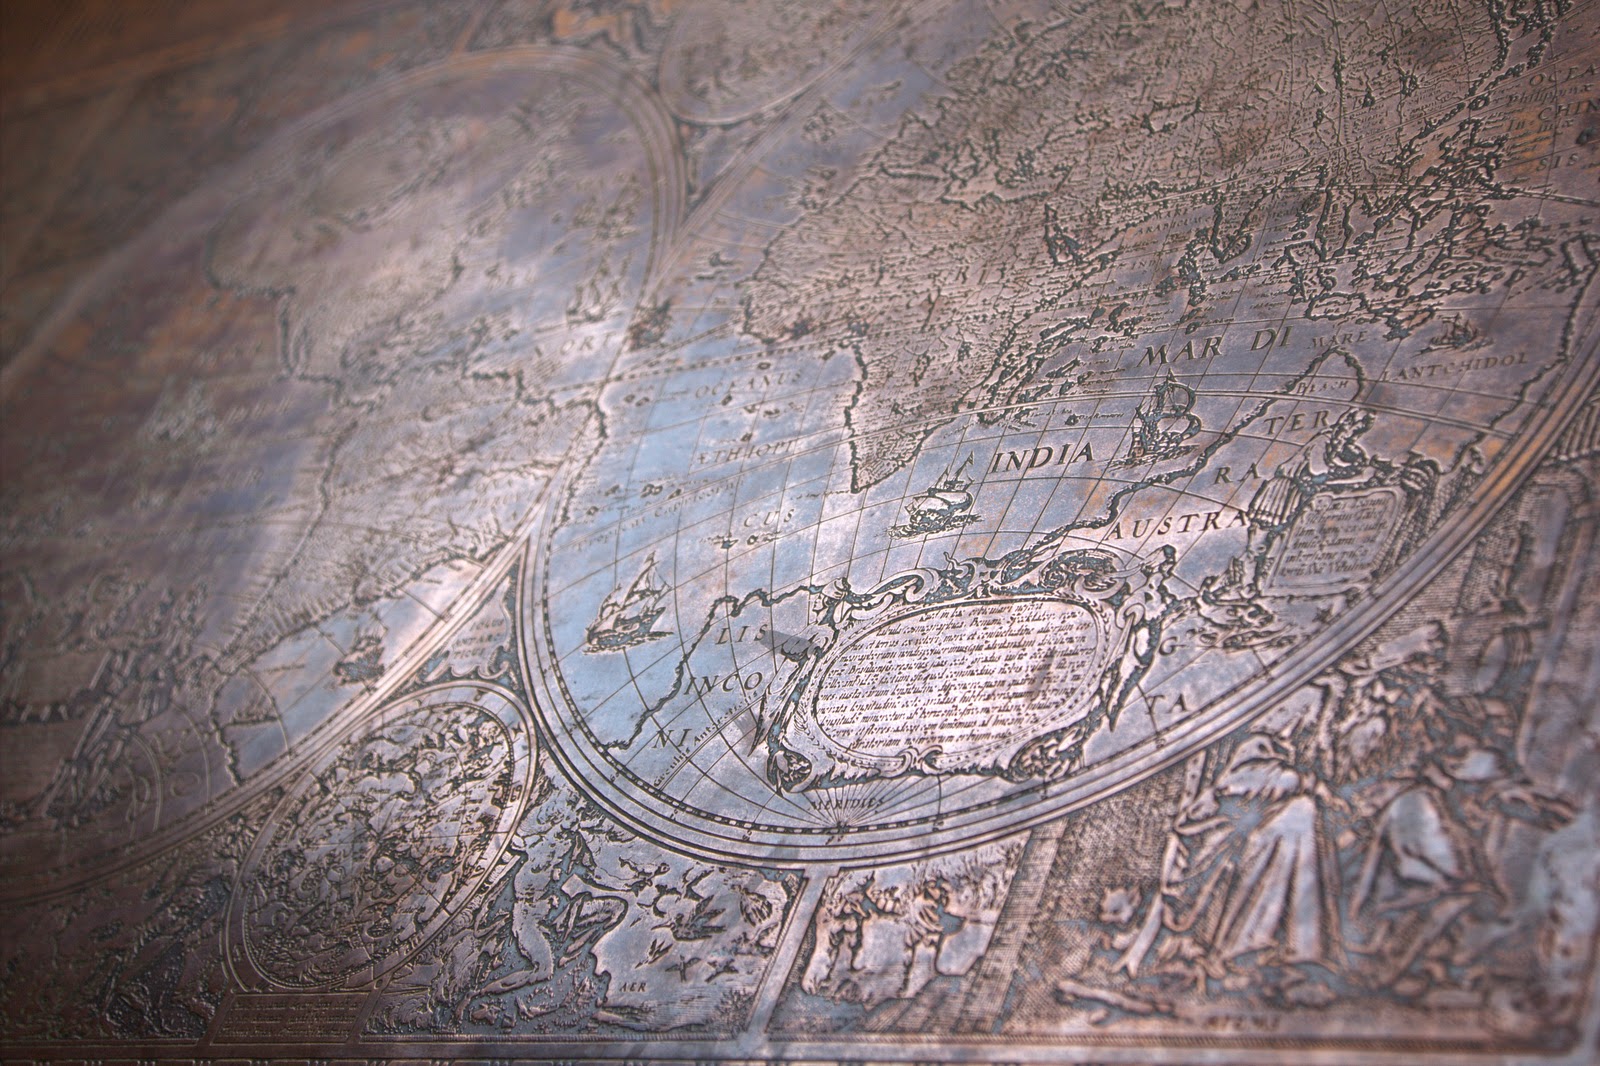
Idag blir det några bilder på ett bord som vi nyligen köpte på auktion. Ett gammalt soffbord i trä som täcks av en världskarta i koppar.
Today I will share pictures of a table that we recently bought at an auction. An old wooden sofa table covered by a world map in copper.
Först polerade vi kopparskivan med salt och citron.
First, we polished the copper with salt and lemon.
Sedan skruvade vi av soffbordsbenen och slipade ner kanterna.
We then removed the old legs and sanded the edges of the board.
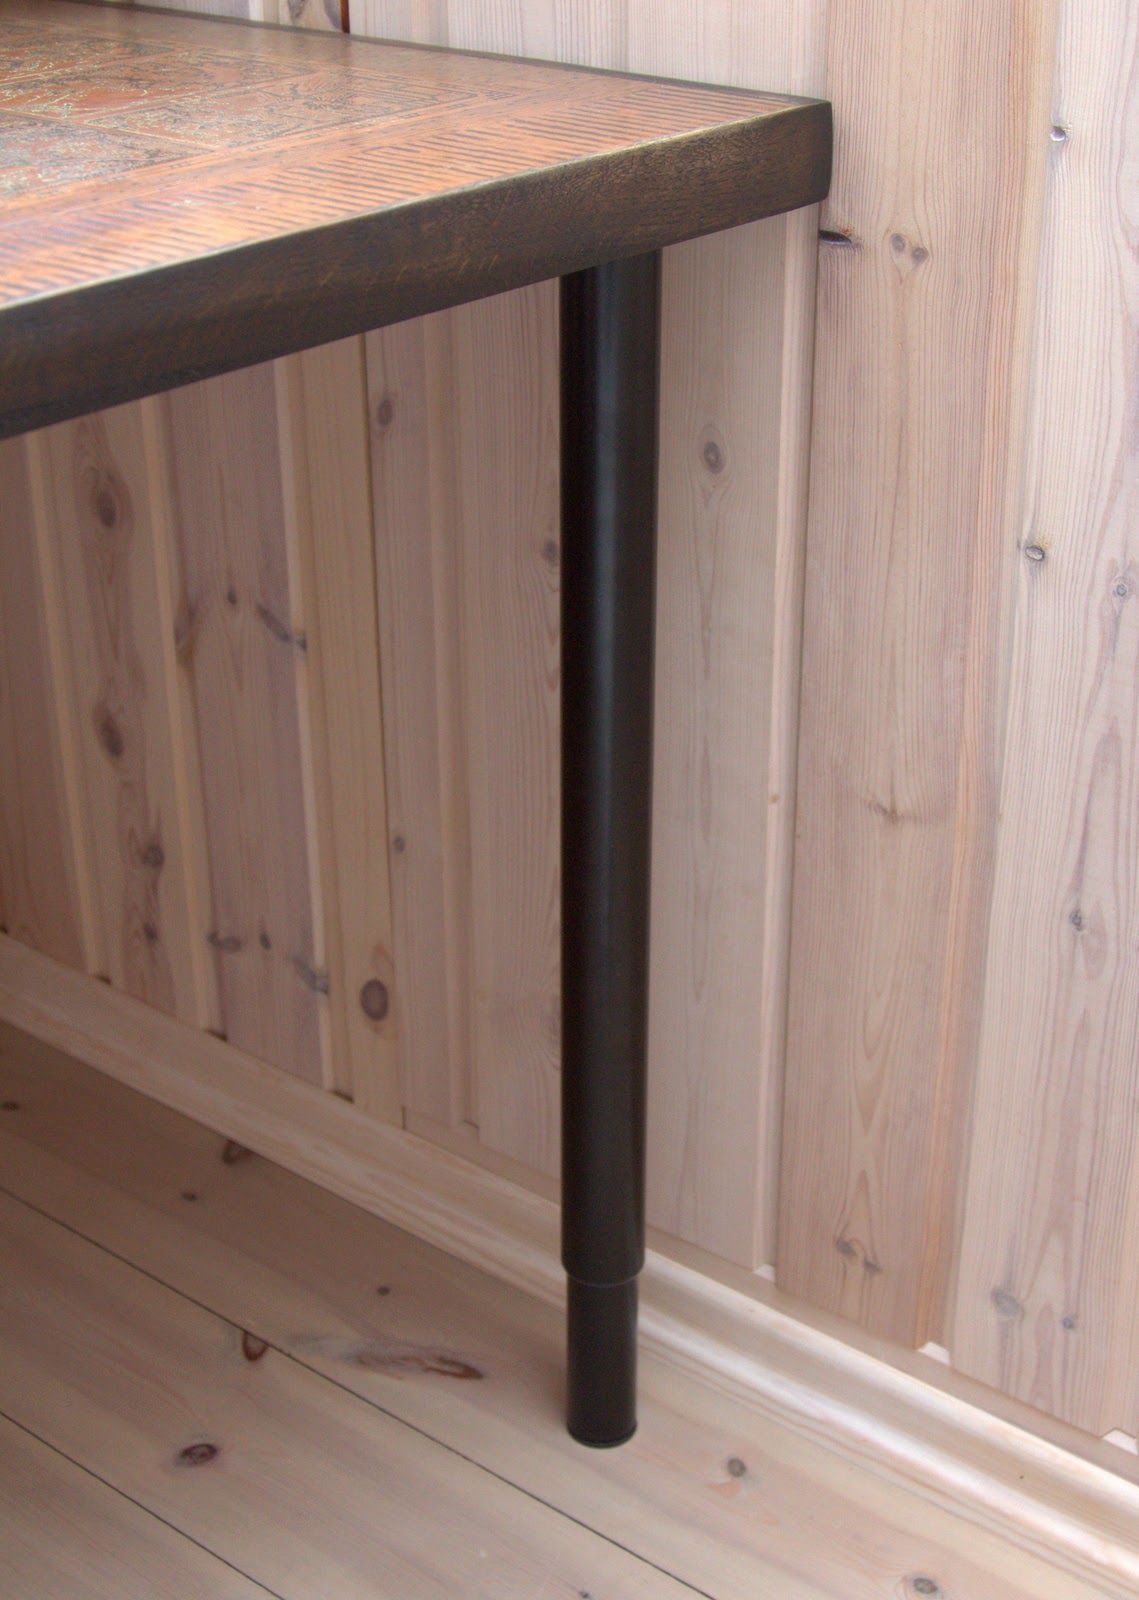
Lite svart linoljevax på kanterna och justerbara ben från IKEA - och det blev ett fint skrivbord!
Some black linseed wax around the edges and adjustable legs from IKEA - and we got a nice desk!
↧
Solvärme på vintern
I september skrev jag om vårt värmesystem med sol och ved. Vi har eldat mycket nu i vinter - mer om det imorgon - men solen ger faktiskt en hel del på vintern när den väl kommer fram.
In September I wrote about our heating system of solar and wood. We have burned a lot of wood this winter - more about that tomorrow - but the sun gives more energy than one would expect during the winter the few hours we see it.
I december hade vi några riktigt kalla och klara dagar. På morgonen var det -9 grader och solfångarna var vita av is och frost. Inte ett moln på himlen och vid kl 10 började solfångarna generera varmvatten till ackumulatortanken. Vid kl 14 stod solen för lågt för att ge någon värme. Som varmast var det 48 grader i solfångarna på taket!
In December we had a few clear and cold days. In the morning we had about -9 degrees Celsius and the solar panels were white from ice and frost. Not a clould in the sky and by 10 am the solar panels started to generate hot water to the tank. Around 2 pm the sun was too low in the sky to generate heat. The temperature peaked at 48 degrees Celsius in the solar panels on the roof!
↧
Isokern skorsten och vattenmantlad kamin
Visst känns det välkomnande med en tänd brasa när man kommer in i ett hus!
It feels welcoming to see a fireplace when you enter a house!
Vi valde en vattenmantlad kamin. Det innebär att ca 30% av värmen från kaminen går ut som strålvärme i rummet medan 70% av värmen går till ackumulatortanken för varmvattenproduktion och golvvärme. På så sätt kan man elda länge utan att det blir för varmt vid brasan - värmen lagras i tanken och sprids i hela huset med golvvärmeslingorna.
We chose a water-bearing fireplace. This means that about 30% of the heat from the fire radiates into the room while the remaining 70% of the heat is stored in a water tank, both for floor heating and tap water. This allows us to keep the fire going for a long time without it getting too hot in the room - the heat is stored in the tank and distributed throughout the house with the floor heating system.
Att kunna elda kändes viktigt för oss så vi placerade skorsten och eldstad centralt i huset. Dels kan man njuta av brasan och dels sprids värmen bättre när eldstaden är i mitten av huset som har en öppen planlösning. På övervåningen har vi ingen golvvärme och inga element, men varm luft stiger och skorstenen fungerar som ett element på natten när man har eldat en kväll.
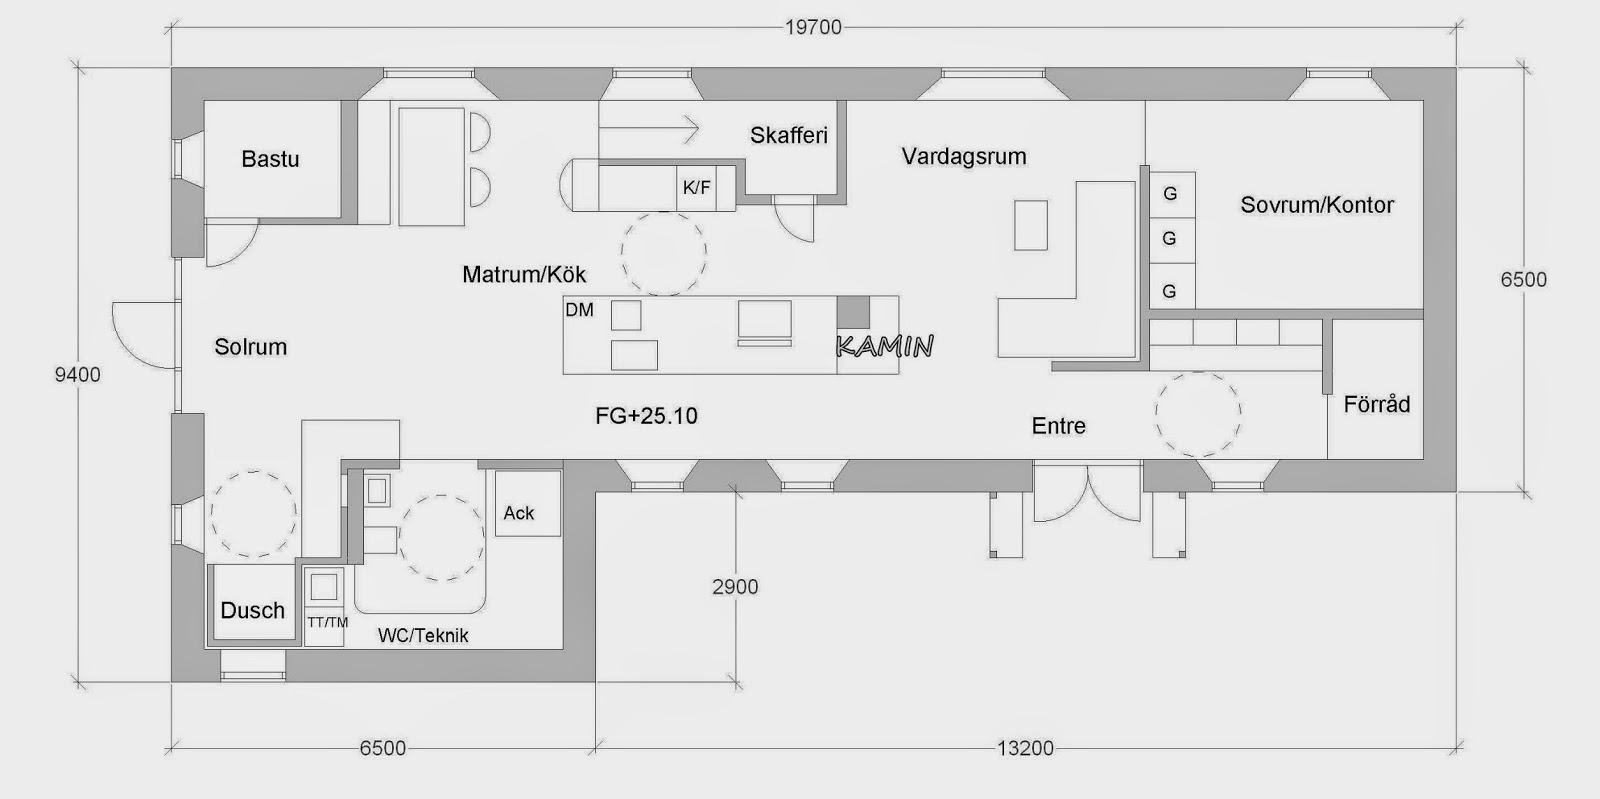
We felt that it was important to have a fireplace and placed the chimney and fireplace in a central location ("kamin" in the floor plan below). Not only can you enjoy the fire from the entryway and living room but the radiation heat is also distributed better when the fireplace is in the middle of an open floor plan. Upstairs we have no radiators and no floor heating, but hot air rises and the chimney functions as a radiator at night when you have had the fire going all evening.
Som jag skrev i ett tidigare inlägg så valde vi en isokern skorsten. Här ser man hur den är uppbyggd med dubbla rör.
As I wrote in an earlier post, we chose an isokern chimney. Here you see how it is constructed with double pipes.
Innan vi började elda flyttade kajorna in i skorstenen...vi hörde hur grenarna trillade ner så det var bara att rensa genom sotluckan och lägga en bit putsnät högst upp.
Before we started to use the fireplace some birds decided to build a nest in the chimney...we heard the sticks fall down through the chimney so we opened up and found quite a few of them. A net on the top of the chimney discouraged them from coming back.
It feels welcoming to see a fireplace when you enter a house!
Vi valde en vattenmantlad kamin. Det innebär att ca 30% av värmen från kaminen går ut som strålvärme i rummet medan 70% av värmen går till ackumulatortanken för varmvattenproduktion och golvvärme. På så sätt kan man elda länge utan att det blir för varmt vid brasan - värmen lagras i tanken och sprids i hela huset med golvvärmeslingorna.
We chose a water-bearing fireplace. This means that about 30% of the heat from the fire radiates into the room while the remaining 70% of the heat is stored in a water tank, both for floor heating and tap water. This allows us to keep the fire going for a long time without it getting too hot in the room - the heat is stored in the tank and distributed throughout the house with the floor heating system.
Att kunna elda kändes viktigt för oss så vi placerade skorsten och eldstad centralt i huset. Dels kan man njuta av brasan och dels sprids värmen bättre när eldstaden är i mitten av huset som har en öppen planlösning. På övervåningen har vi ingen golvvärme och inga element, men varm luft stiger och skorstenen fungerar som ett element på natten när man har eldat en kväll.
We felt that it was important to have a fireplace and placed the chimney and fireplace in a central location ("kamin" in the floor plan below). Not only can you enjoy the fire from the entryway and living room but the radiation heat is also distributed better when the fireplace is in the middle of an open floor plan. Upstairs we have no radiators and no floor heating, but hot air rises and the chimney functions as a radiator at night when you have had the fire going all evening.
Som jag skrev i ett tidigare inlägg så valde vi en isokern skorsten. Här ser man hur den är uppbyggd med dubbla rör.
As I wrote in an earlier post, we chose an isokern chimney. Here you see how it is constructed with double pipes.
Rören som sticker upp ur golvet till vänster om murstocken är dels till ackumulatortanken för transport av varmvatten, dels tilluft utifrån till kaminen.
The pipes coming up through the floor to the left of the chimney are for the transport of hot water to the water tank and also for the external air intake for the fireplace.
Innan vi började elda flyttade kajorna in i skorstenen...vi hörde hur grenarna trillade ner så det var bara att rensa genom sotluckan och lägga en bit putsnät högst upp.
Before we started to use the fireplace some birds decided to build a nest in the chimney...we heard the sticks fall down through the chimney so we opened up and found quite a few of them. A net on the top of the chimney discouraged them from coming back.
↧
↧
Det är mysigt att elda!
Som jag skrev i inlägget igår har vi investerat i en vattenmantlad kamin som vi njuter av dagligen på vintern.
As I wrote in the post from yesterday, we invested in a water-bearing fireplace that we enjoy daily during winter.
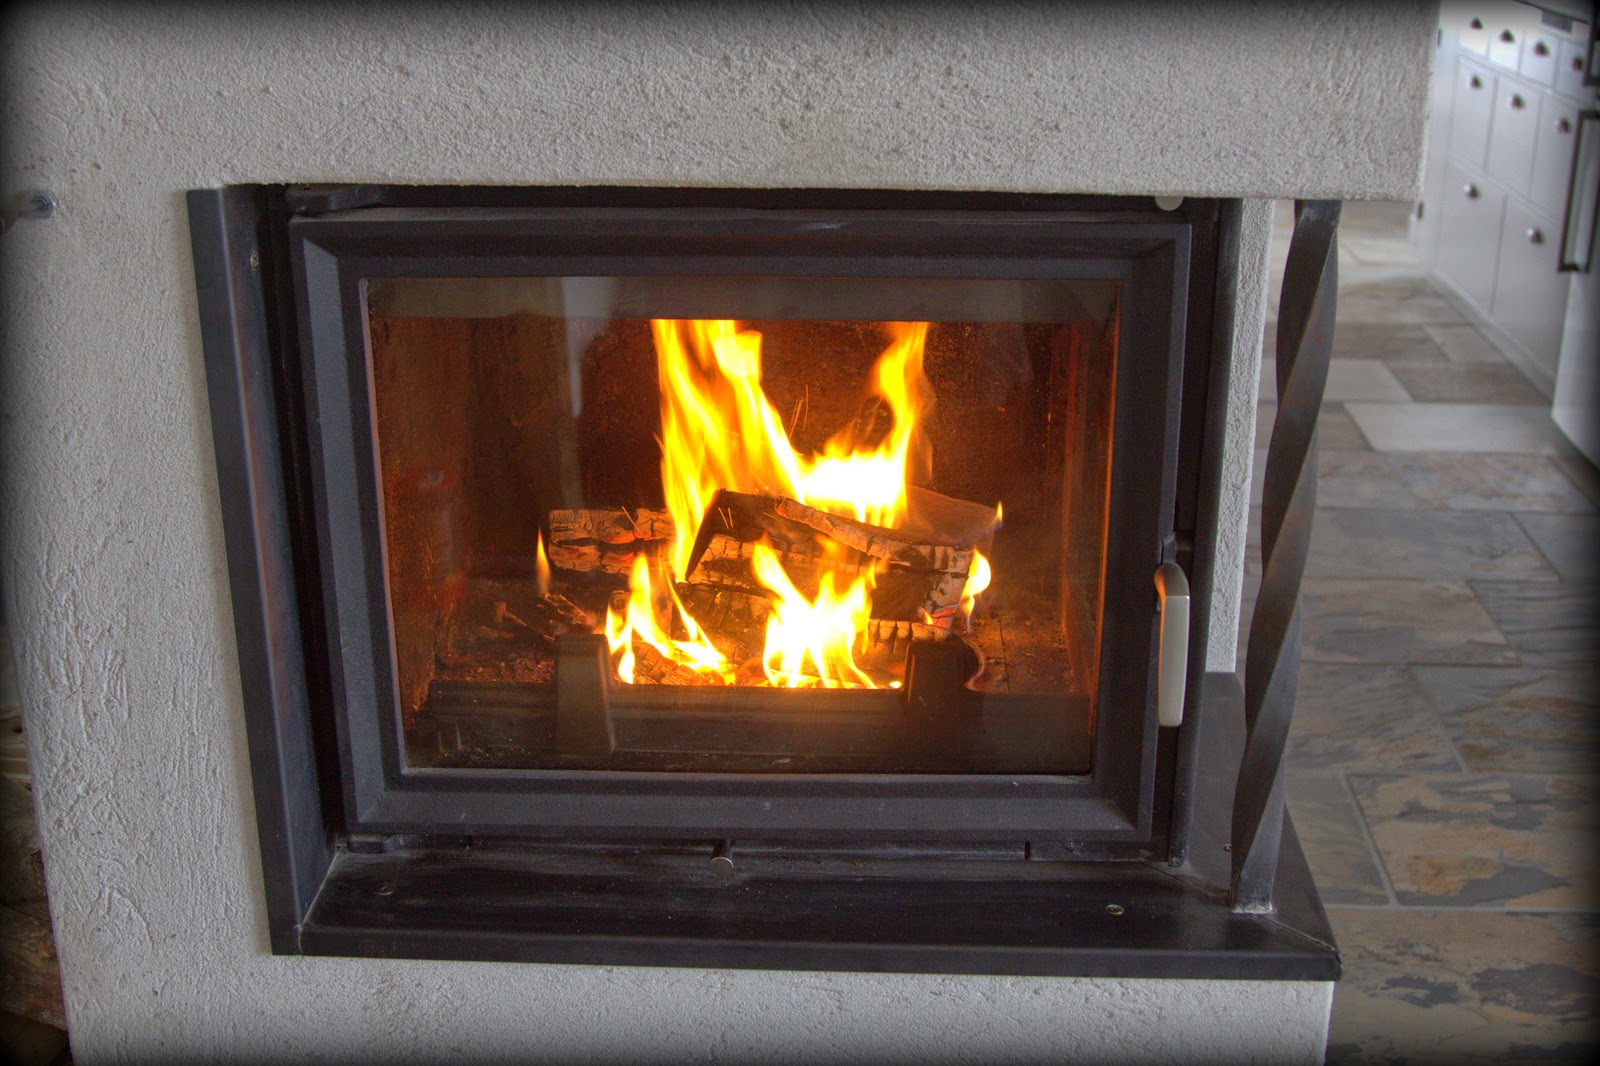
Det är en "12 kW Maja, höger hörn, med extern luft och kylslinga" från Karles Kaminer. Som ni ser på bilden nedan är det glas på två sidor. Extern luften dras in genom ett rör som ligger ingjutet i golvet, mellan norrväggen och undersidan av kaminen - istället för att använda uppvärmd luft inomhus tar kaminen friskluft till förbränningen direkt utifrån. Kylslingan är en säkerhetsanordning som gör att elden släcks om kaminen skulle bli överhettad.
The fireplace we purchased is a "12 kW Maja, höger hörn, med extern luft och kylslinga" from Karles Kaminer. As you can see in the picture below, it is a corner fireplace with glass on two sides. Instead of using heated indoor air the fireplace takes fresh outdoor air directly through a pipe that goes from the north wall through the floor to the bottom of the fireplace. If the fireplace gets overheated there is a safety cooling mechanism that shuts it down.
Vi valde också att köpa en "isoleringslåda" för att hålla mer av värmen i kaminen och vattentanken. Det är det silvriga på bilden nedan. För att kaminen ska kommunicera med ackumulatortanken och ladda den med lagom varmt vatten köpte vi också ett "Installationspaket koppling mot tank" från Kaminkungen.
We also decided to buy an insulating kid to keep more of the heat in the fireplace and in the watertank. It is the shiny layer in the picture below. In addition, we purchased an installation kit ("Installationspaket koppling mot tank") from Kaminkungen. This is the technology that ensures that the fireplace communicates with the water tank and fills it with warm water at the right temperature.
Vi använde leca block och leca balkar för att bygga in kaminen och skapa 2 vedfack. Dessutom satte vi en järnstång för att hålla uppe leca blocken i hörnan. Så här såg det ut när kaminen var installerad men oputsad. Vi byggde sedan på med fler lecablock i höjd med skorstensanslutningen, och putsade med samma NHL bruk från Målarkalk som vi använde till alla innerväggar.
We used leca (expanded clay aggregate) blocks and beams when building up the fireplace. We also made two pockets for wood. To hold up the right leca corner we added an iron post. This is what is looked like when the fireplace was installed but before it was plastered. We then added more leca blocks, up to the pipe that goes into the chimney, and then plastered with the same natural hydraulic lime plaster from Målarkalk that we used for all the interior walls.
Runt den putsade kanten vid luckan satte vi en svart järnlist. Öppnar man luckan för långt skrapar man annars lätt av putsen till vänster. Dessutom blir det ju alltid lite smutsigt när man öppnar luckan och då tyckte vi det var enklare med svart järn än vit puts.
Around the plastered edge by the glass door we added black iron molding. If you open the door too far you easily scratch the plaster on the left side. In addition, it is hard to keep it clean under the door so we thought it was more convenient with black iron instead of white plaster.
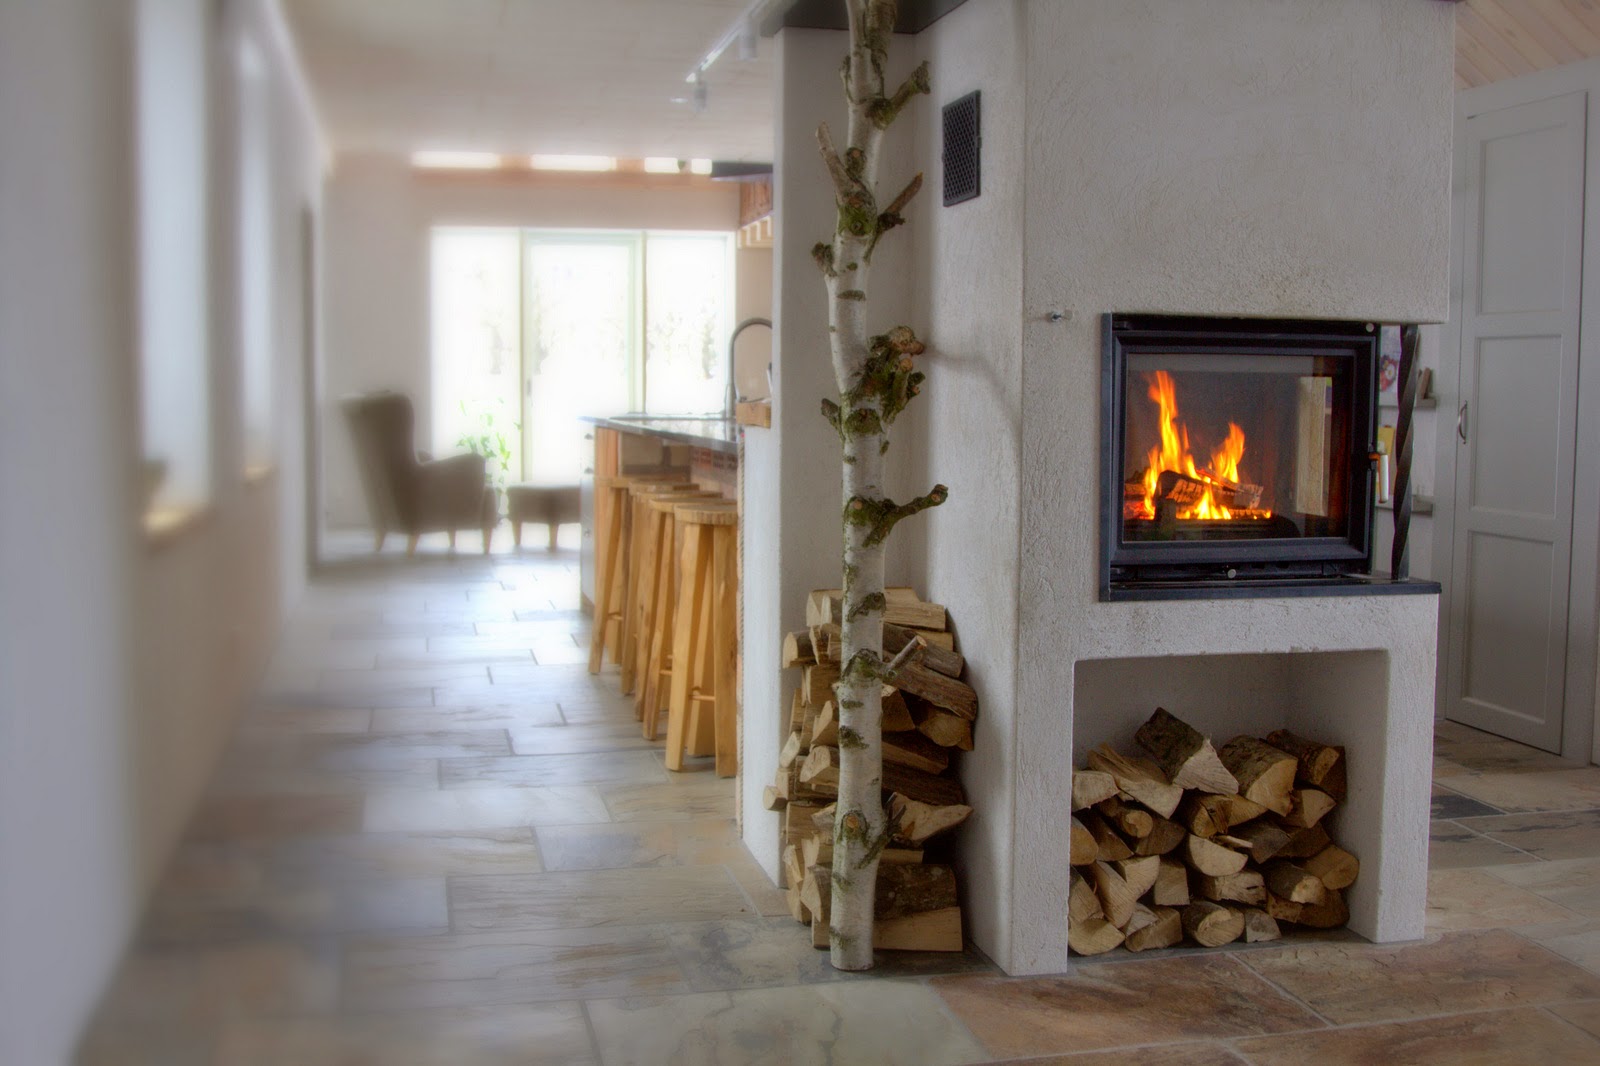
Ovanpå kaminen lade vi en svart granitskiva, uppochnervänd eftersom vi bara ser undersidan. Den ligger löst, men stilla av sin egen tyngd, så att man kan lyfta av den om det skulle krångla med tekniken inne i kaminen. När man eldar blir den varm, lagom varm för att torka vantar och stövlar. Där ett av skivans hörn sticker ut i luften satte vi en björkstamm. Funkar bra att hänga mössor och vantar på den! Det svarta gallret bakom björken släpper också ut lite överskottsvärme från kaminen.
On top of the fireplace we put black granite, upsidedown since we only see the underside. It lays loose, but still because of its own weight, so that we can remove it in case something needs to be fixed in the fireplace. When the fire is going the granite warms up, just right for drying wet mittens and boots. Where one of the granite corners sticks out we put a birch. Works well for hanging hats and gloves! The black iron grid behind the birch also lets out some excess heat from the fireplace.
↧
Gäststuga med sovloft
I slutet av mars förra året flyttade vi in i gäststugan eftersom vi byggde färdigt den före bostadshuset. Vi bodde på 25 kvm plus ett sovloft i ett halvår innan vi flyttade in i stora huset. Gäststugan har allt man behöver, i liten skala, så det fungerade mycket bra!
Last year, at the end of March, we moved into the guest house since we finished that before the main house. Our living space was 25 kvm plus a sleeping loft until we moved into the main house. The guest house has everything you need, although small, so it worked quite well!
Gäststugan och garaget är en byggnad med 58 kvm byggyta. Väggarna är drygt 30 cm tjocka så innermåttet är bara 48 kvm. Garaget tar upp ungefär halva nedervåningen - se planritningen nedan. Andra halvan av huset, 25 kvm, är gäststugan med litet kök, vardagsrum och badrum. Även om det är litet fick vi även plats med ett litet badkar!
The guest house and garage is a building with a construction area of approximately 58 square meters, exterior measurements. The walls are approximately 30 cm thick so the interior living space is about 48 square meters. The garage takes up about half of the first floor - see the floorplan below. The other half of the house, 25 square meters, is the guesthouse with a small kitchen, living room and bathroom. Even though it is small, we could still fit a small bathtub!
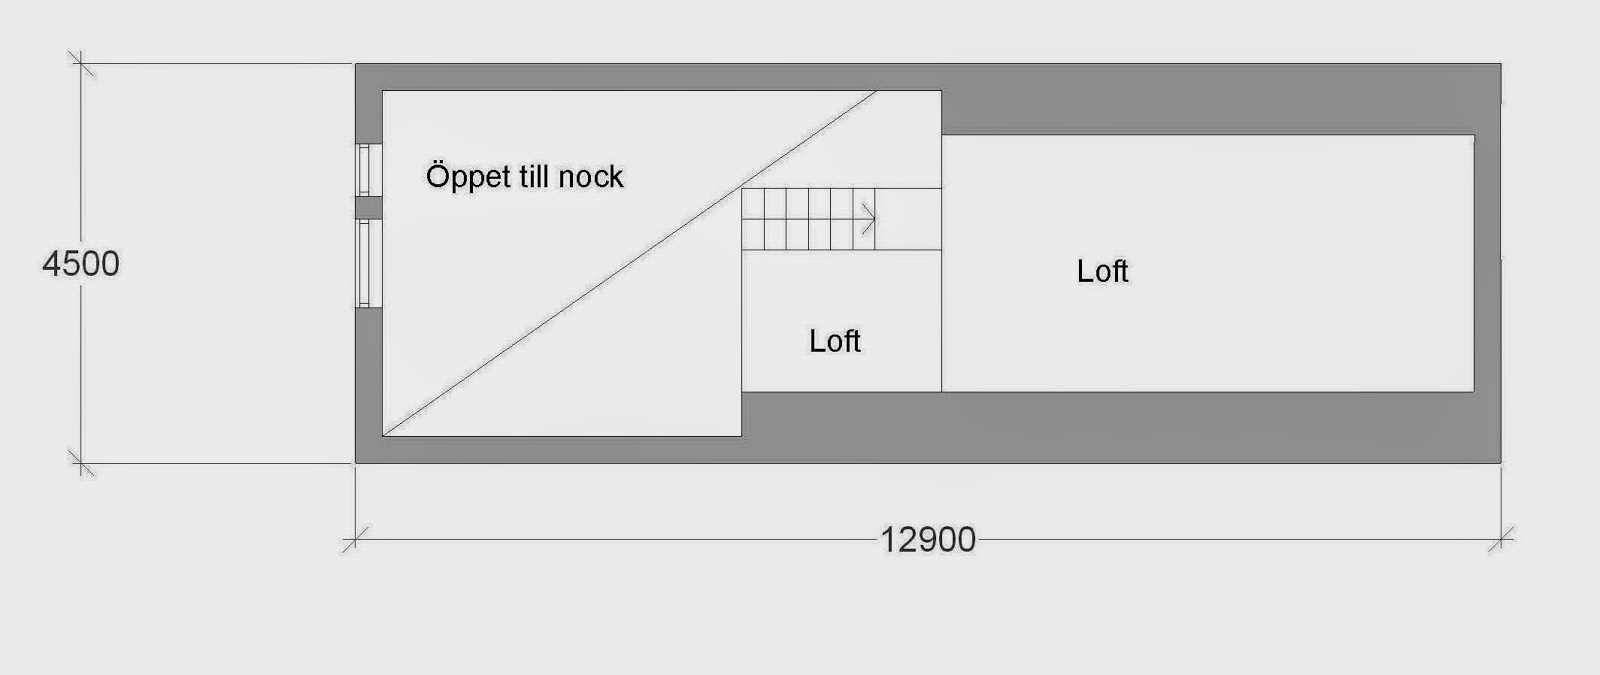
Större delen av gäststugan är öppet upp till nock. Ovanför köksdelen och badrummet ligger ett sovloft. Ovanför garaget har vi också ett sovloft, ett steg upp från det lilla loftet.
Most of the guest house has high ceilings. Above the kitchen area and bathroom is a small sleeping loft. Above the garage is another sleeping loft, one step above the small loft.
Last year, at the end of March, we moved into the guest house since we finished that before the main house. Our living space was 25 kvm plus a sleeping loft until we moved into the main house. The guest house has everything you need, although small, so it worked quite well!
Gäststugan och garaget är en byggnad med 58 kvm byggyta. Väggarna är drygt 30 cm tjocka så innermåttet är bara 48 kvm. Garaget tar upp ungefär halva nedervåningen - se planritningen nedan. Andra halvan av huset, 25 kvm, är gäststugan med litet kök, vardagsrum och badrum. Även om det är litet fick vi även plats med ett litet badkar!
The guest house and garage is a building with a construction area of approximately 58 square meters, exterior measurements. The walls are approximately 30 cm thick so the interior living space is about 48 square meters. The garage takes up about half of the first floor - see the floorplan below. The other half of the house, 25 square meters, is the guesthouse with a small kitchen, living room and bathroom. Even though it is small, we could still fit a small bathtub!
 |
| Gäststuga och garage, plan 1 |
Större delen av gäststugan är öppet upp till nock. Ovanför köksdelen och badrummet ligger ett sovloft. Ovanför garaget har vi också ett sovloft, ett steg upp från det lilla loftet.
Most of the guest house has high ceilings. Above the kitchen area and bathroom is a small sleeping loft. Above the garage is another sleeping loft, one step above the small loft.
 |
| Gäststuga, plan 2 |
↧
Skiffer pussel i gäststugan
För nästan ett år sedan berättade jag om skiffergolvet som vi köpte och sorterade. Vi lade skiffer på hela nedervåningen i båda husen (utom garaget) och är mycket nöjda. Det är ett snyggt, levande och tåligt golv i härliga naturfärger.
Almost a year ago I wrote about the slate floor that we bought and sorted. We used the slate throughout the first floor of both houses (but not in the garage) and are very happy with that decision. It is a durable, nice looking floor that feels alive in its earthy tones and patterns.
Det var värt besväret att öppna alla förpackningarna och sortera plattorna för de varierade mycket i både mönster och färg. Bilden ovan är från gäststugans vardagsrum. Bilden nedan är från hallen i gäststugan.
It was worth the effort to open up all the crates and sort the slate tiles because they varied so much, in color and pattern. The picture above is from the guest house living room. The picture below is from the guest house entry way.
De röda tonerna i hallgolvet leder till badrummet som har tegelröda tadelakt väggar.
The shades of red in the entryway floor lead to the bathroom which has brick red tadelakt walls.
I badrummet skar vi 40x60 plattorna till mindre mosaik, ca 10x10 cm för att klara lutningen mot hörnavloppet.
In the bathroom, we cut the 40x60 tiles into smaller mosaic pieces, approx. 10x10 cm, to ensure the slope towards the corner drain.
Vi lade skiffer plattorna i Höganäs LättFix FB1300.
We glued the slate tiles with Höganäs LättFix FB1300.
Resultatet blev bra, men inte helt färdigt utan fog. Eftersom skiffer plattorna var ojämna på alla håll gick det åt en hel del fix, och fogarna blev ca 12 mm. Därför gick det också åt mycket fog.
The result was good, but not quite finished without the grout. Since the slate tiles were very uneven in all directions we ended up using quite a bit of fix, and the grout lines are about 12 mm wide. Therefore, we also used a lot of grout.
Vi fogade med Mapei Skiferfug. Den skulle spritsas, vilket blev lite pilligt. Innan vi fogade ytbehandlade vi plattorna för att undvika fläckar av fog.
We used Mapei Skiferfug as grout, squirted out by hand which was a bit labor intensive. Before we applied the grout we treated the slate tiles to avoid grout stains.
↧
Första spadtaget på hugelkulturen
Idag tog vi första spadtaget på vår hugelkultur!
Today we started digging on our hugelkultur!
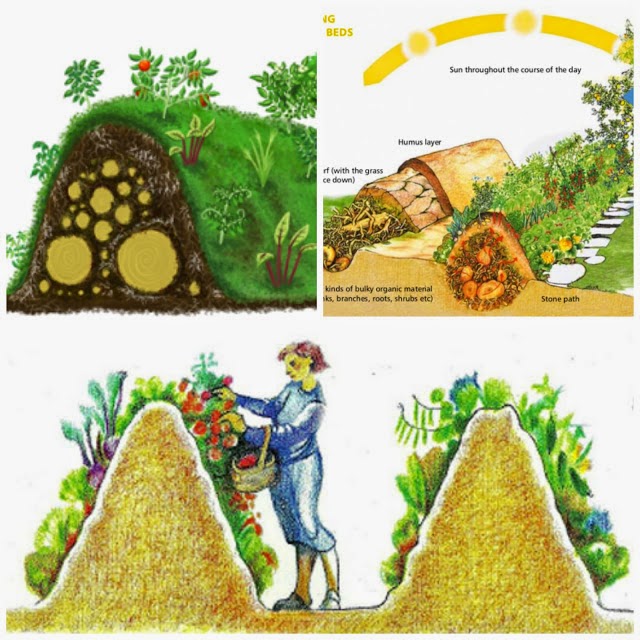
En "hugelkultur" är ett koncept inom permakultur och innebär i princip att man bygger en kulle med gamla stockar, grenar och kvistar som bas och sedan fyller man på med biomassa - halm, löv, ogräs, kompost, tång, fallfrukt, gräsklipp - innan man lägger jord överst. Den här bilden illustrerar idén.
A "hugelkultur" is a concept within permaculture and basically means that you build a hill from old logs and branches as the base and then you add biomass - straw, leaves, weeds, compost, sea weed, wind fall, grass clippings - before you cover the hill with soil. This picture illustrates the idea.
Fördelen med en hugelkultur är att veden suger åt sig vatten och bryts ned långsamt av mikroorganismer. Man behöver inte vattna så mycket och näringen finns inbyggd i konstruktionen. Dessutom får man ofta ett gynnsamt mikroklimat på sluttningarna. Har man flera kullar nära varandra blir det skyddade dalgångar emellan!
The key benefit of a hugelkultur is that the wood will soak up water and is slowly decomposed by micro organisms. You don't need to water as much and nutrients are built into the construction. In addition, you often get a beneficial micro climate on the hill sides. If you have several hills close together you get sheltered valleys in between!
Nu gäller det att samla ved och annan biomassa! Vi började att rensa lite i bäcken en bit bort. Bra för fisken i bäcken och bra för oss. Fuktig ved som redan börjat förmultna innhåller ju redan mycket fukt och micro organismer.
We now have to collect wood and other biomass! We started cleaning up in the nearby creek. Good for the fish in the creek and good for us. Wet wood that has already started to decompose already contains mositure and micro organisms.
Vi passade också på att få ett lass från våra grannars markarbete!
We also got a load from our neighbors' landscaping project!
Dags att gräva!
Time to dig!
Tack till våra vänner på Little Gardens i Katslösa som inspirerade oss till att experimentera med en hugelkultur!
Thank you to our friends at Little Gardens in Katslösa who inspired us to experiment with a hugelkultur!
Today we started digging on our hugelkultur!
En "hugelkultur" är ett koncept inom permakultur och innebär i princip att man bygger en kulle med gamla stockar, grenar och kvistar som bas och sedan fyller man på med biomassa - halm, löv, ogräs, kompost, tång, fallfrukt, gräsklipp - innan man lägger jord överst. Den här bilden illustrerar idén.
A "hugelkultur" is a concept within permaculture and basically means that you build a hill from old logs and branches as the base and then you add biomass - straw, leaves, weeds, compost, sea weed, wind fall, grass clippings - before you cover the hill with soil. This picture illustrates the idea.
 |
| Från: http://www.naturalblaze.com/2013/04/hugelkultur-natural-permaculture.html |
Fördelen med en hugelkultur är att veden suger åt sig vatten och bryts ned långsamt av mikroorganismer. Man behöver inte vattna så mycket och näringen finns inbyggd i konstruktionen. Dessutom får man ofta ett gynnsamt mikroklimat på sluttningarna. Har man flera kullar nära varandra blir det skyddade dalgångar emellan!
The key benefit of a hugelkultur is that the wood will soak up water and is slowly decomposed by micro organisms. You don't need to water as much and nutrients are built into the construction. In addition, you often get a beneficial micro climate on the hill sides. If you have several hills close together you get sheltered valleys in between!
Nu gäller det att samla ved och annan biomassa! Vi började att rensa lite i bäcken en bit bort. Bra för fisken i bäcken och bra för oss. Fuktig ved som redan börjat förmultna innhåller ju redan mycket fukt och micro organismer.
We now have to collect wood and other biomass! We started cleaning up in the nearby creek. Good for the fish in the creek and good for us. Wet wood that has already started to decompose already contains mositure and micro organisms.
Vi passade också på att få ett lass från våra grannars markarbete!
We also got a load from our neighbors' landscaping project!
Dags att gräva!
Time to dig!
Tack till våra vänner på Little Gardens i Katslösa som inspirerade oss till att experimentera med en hugelkultur!
Thank you to our friends at Little Gardens in Katslösa who inspired us to experiment with a hugelkultur!
↧
↧
Linoljevaxad slätspont som sovloftsgolv
Som jag skrev tidigare så har vi skiffergolv på nedervåningen i gäststugan. På "ovanvåningen" har vi två sovloft - se planritningen - och där valde vi trägolv.
As I wrote earlier we have slate floor on the first floor of the guesthouse. Upstairs we have two sleep lofts - see the floor plans - and we chose wooden flooring here.
Vi ville ha ett enkelt trägolv som man lätt kan underhålla själv. Dessutom ville vi inte ha det för tjockt eftersom det redan är lågt till taket på loftet. Vi lade 28 mm slätspont (fur) direkt på takstolarna. Så här såg det ut när det var lagt, innan det var behandlat.
We wanted a simple wooden floor that we could maintain ourselves. Also, we did not want to have too thick of a floor since the ceiling height is already pretty limited. We used 28 mm planed tongue and groove solid pine flooring (which is usually used as an underfloor in construction) directly on the trusses. This is what it looked like when it was done, but before it was treated.
Först slipade vi golvet. Sedan vaxade vi med Allbäcks linoljevax. Det var ganska enkelt - gnida in vaxet med en svamp, för hand, och sedan torka av/polera med en gammal handduk. Färdigt! Efter ca en vecka blev det helt torrt. Om golvet är slätt innan man vaxar får man en härligt sammetslen yta.
We first sanded the floor. Then we used Allbäcks linseed wax. It was pretty easy - spread out the wax with a sponge and rub it in, by hand, then wipe off and polish with an old rag. Done! It took about 1 week for it to completely dry. If the floor is smooth before you wax it the finished surface feels like velvet.
På det stora loftet valde vi en mörkare färg - blandade Allbäcks Linoljevax grå, svart, vitt och naturell.
We used a dark color on the large sleep loft - mixed Allbäcks Linseed wax grey, black, white and clear.
På det lilla loftet, ovanför badrum och kök, ville vi ha det ljusare och använde en blandning av Allbäcks Linoljevax vitt och naturell.
For the smaller sleep loft, above the bathroom and kitchen, we wanted a lighter color and used a mix of Allbäcks Linseed wax white and clear.
Golven är enkla att städa. Skulle man spilla något eller skvätta när man putsar takfönsterna så är det bara att torka upp utan att det blir fläckar. Man kan naturligtvis inte låta vätskan ligga kvar på golvet en längre tid. Blir golvet slitet och man vill bättra på är det bara att ta fram burken, svampen och trasan och göra det! Man behöver alltså inte göra om hela golvet utan det går bra att bättra på delar av det. Vill man göra ytan lite mer slitstark kan man vaxa med naturell över hela golvet för då sliter man på den ytan innan man sliter på det färgade vaxet.
The floors are easily cleaned. If you were to spill something or splash water when you clean the skylights you simply wipe off the liquid and there are no stains. Of course, you cannot wait too long to clean up the liquid. When the floors start to get worn you can easily touch them up - just bring out the wax bucket, a sponge and a rag and do it! You don't need to redo the entire floor but can touch up only the areas that need it. If you want to make the floor a bit more durable you can add one coat of clear wax. That way you wear down the clear wax first instead of the colored wax.
↧
Smart trappa med förvaring till sovloft
Förra veckan skrev jag ett inlägg om sovloftet i gäststugan. Det tog många kvällar att fundera ut lösningen på hur man bäst tar sig upp och ner mellan loftet och resten av gäststugan. Gäststugan är ju ganska liten och man vill ju inte att en trappa ska ta upp halva nedervåningen. Samtidigt är det inte lätt att klättra på en lodrät stege. Dessutom måste man ta hänsyn till Boverkets regler och byggnadsnämndens åsikter och tolkningar. Vi hade inte heller en obegränsad budget för trappan. Det var alltså lite pusslande att få till en trappa som var både funktionell, godkänd för bygglov och rimlig i pris...men till slut hittade vi en lösning som alla var nöjda med!
Last week I wrote a blog post about the sleeping loft in the guest house. It took many evenings to solve the question of how one would move between the sleeping loft and the rest of the guest house. The guest house is quite small and you don't want a staircase that dominates the entire room. At the same time it is not easy to climb on a vertical ladder. Also, we had to follow the Swedish building code and the opinions and interpretations of the local authorities. In addition, our budget for this stair case was not unlimited. To summarize, it was quite a challenge to find a staircase solution that was functional and approved for the building permit at a reasonable price...but finally we found a solution that everyone was happy with!
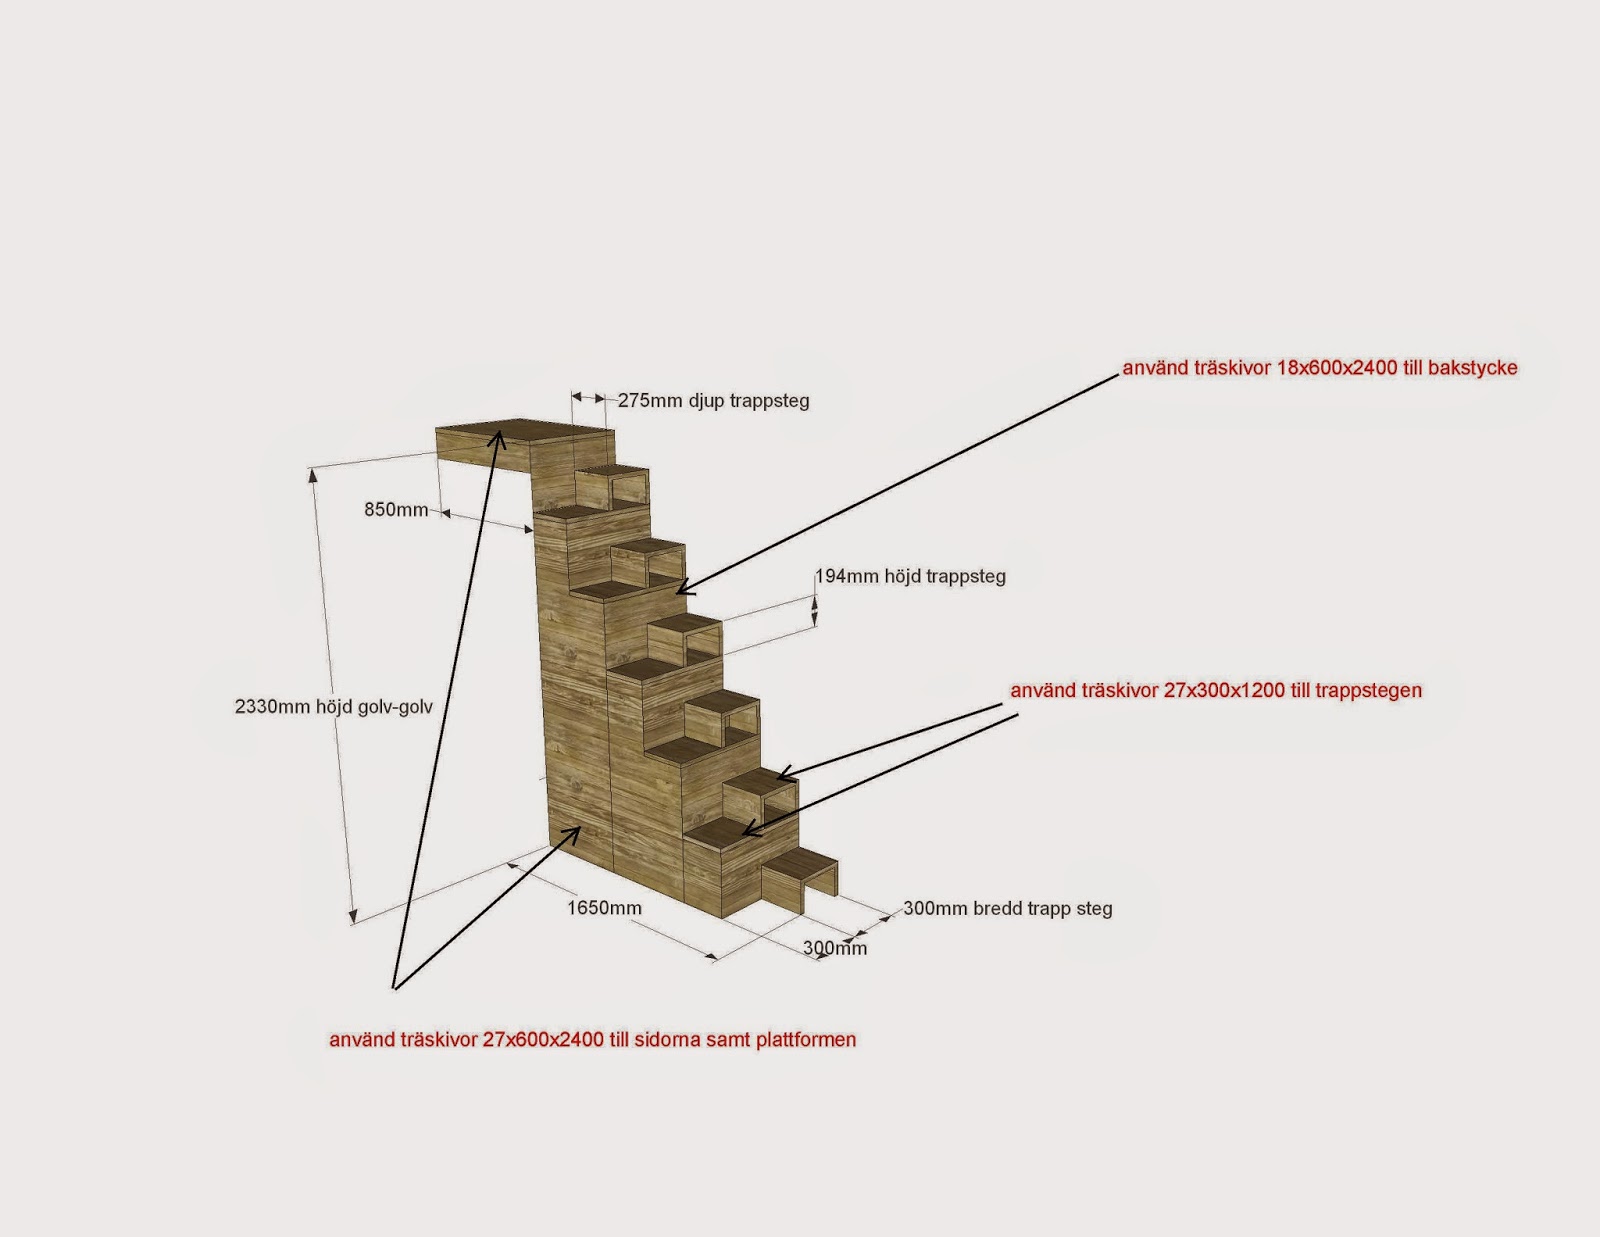
Som ritningen nedan visar så använde vi limträskivor i fur, 18 mm tjocklek på bakstycken och 27 mm tjocklek till sidoväggar och trappsteg. Under trappan finns en liten garderob och lådorna på framsidan erbjuder också möjlighet till förvaring. I en sådan här trappa går man till höger och vänster samtidigt som man går upp eller ner. Det tar ett par gånger innan man vänjer sig men efter ett tag känns den som vilken trappa som helst - vrider man lite på höfterna funkar det ännu bättre! Eftersom man går åt sidorna samtidigt som man går på höjden blir trappan hälften så lång som den annars skulle varit, men med bekvämt stegdjup och steghöjd.
As shown on the drawing below, we used wooden pine boards, 18 mm thick for the back and 27 mm thick for the sides and the steps. Underneath the staircase is a small closet and the boxes in front provide extra storage. In this type of staircase you walk right and left at the same time as you walk up or down. It takes a few tries before you get used to it but after a while it feels like any staircase - if you turn the hips a bit it works even better! Since you walk sideways at the same time as you climb height this staircase takes up half the space, while at the same time providing comfortable height and depth for each step.
Först byggde vi sidorna...
We started with the side boards...
...sedan trappsteg och bakstycken...
...then the steps and the backs...
...och till sist lådorna som blir som halvsteg, och förvaring!
...and finally the boxes that are half steps, and storage!
Vi vaxade hela trappan i vitt med Allbäcks linoljevax.
We waxed the entire staircase in white with Allbäcks linseed wax.
Last week I wrote a blog post about the sleeping loft in the guest house. It took many evenings to solve the question of how one would move between the sleeping loft and the rest of the guest house. The guest house is quite small and you don't want a staircase that dominates the entire room. At the same time it is not easy to climb on a vertical ladder. Also, we had to follow the Swedish building code and the opinions and interpretations of the local authorities. In addition, our budget for this stair case was not unlimited. To summarize, it was quite a challenge to find a staircase solution that was functional and approved for the building permit at a reasonable price...but finally we found a solution that everyone was happy with!
|
Som ritningen nedan visar så använde vi limträskivor i fur, 18 mm tjocklek på bakstycken och 27 mm tjocklek till sidoväggar och trappsteg. Under trappan finns en liten garderob och lådorna på framsidan erbjuder också möjlighet till förvaring. I en sådan här trappa går man till höger och vänster samtidigt som man går upp eller ner. Det tar ett par gånger innan man vänjer sig men efter ett tag känns den som vilken trappa som helst - vrider man lite på höfterna funkar det ännu bättre! Eftersom man går åt sidorna samtidigt som man går på höjden blir trappan hälften så lång som den annars skulle varit, men med bekvämt stegdjup och steghöjd.
As shown on the drawing below, we used wooden pine boards, 18 mm thick for the back and 27 mm thick for the sides and the steps. Underneath the staircase is a small closet and the boxes in front provide extra storage. In this type of staircase you walk right and left at the same time as you walk up or down. It takes a few tries before you get used to it but after a while it feels like any staircase - if you turn the hips a bit it works even better! Since you walk sideways at the same time as you climb height this staircase takes up half the space, while at the same time providing comfortable height and depth for each step.
 |
| Arkitekt/Designer: Anneli Schalock |
Först byggde vi sidorna...
We started with the side boards...
...sedan trappsteg och bakstycken...
...then the steps and the backs...
...och till sist lådorna som blir som halvsteg, och förvaring!
...and finally the boxes that are half steps, and storage!
Vi vaxade hela trappan i vitt med Allbäcks linoljevax.
We waxed the entire staircase in white with Allbäcks linseed wax.
↧
Trappräcke av järn och björk
Tidigare i veckan skrev jag om vår special trappa till sovloftet i gäststugan. På bilderna kunde man se lite av trappräcket också.
Earlier this week I wrote about our special staircase to the sleeping loft in the guest house. On the pictures you could also see portions of the railing.
Först klädde vi kanten på bjälklaget med björknäver - limmade och spikade fast bitarna.
We first covered the edge of the beams/trusses with birch bark - glued and nail the pieces.
Nävern köpte vi från Gyllenhaks Byggnadsvård. Oftast använde vi den grå-vita sidan, utsidan på trädet, men ibland vände vi på den och satte baksidan utåt.
We bought the birch bark from Gyllenhaks Byggnadsvård. Most of the time we used the grey and white side, the outside of the tree, but sometimes we turned it over and used the back side.
Stommen på räcket är gjort av järn.
The main structure of the railing is made of iron.
Sedan knöt vi fast björkstavar som vi skördade året innan från häckarna runt om vårt område.
We then tied on birch branches that we harvested the prior year from the tall hedges around our area.
Vi använde en blandning av hampa, lin och sisal snöre.
We used a combination of hemp, flax and sisal twine.
Även om det är en gäststuga så är det ändå Boverkets regler för trappor och fallskydd som gäller. Det betyder minst 90 cm högt räcke med max 10 cm öppningar i räcket.
Even if it is a guest house we still need to follow the building code for staircases and railings. That means a railing that is at least 90 cm high and the openings in it cannot exceed 10 cm.
Vid själva trappan använde vi lite tjockare björkstavar med avklippta grenar som krokar.
By the staircase we used thicker birch branches with cut off branches as hooks.
Fungerar perfekt för att hänga upp jackor i entren i gäststugan!
Works perfectly as a coat hanger in the entry way of the guest house!
↧


